
Are you searching for a dessert that’s both easy to make and irresistibly delicious? Look no further than the No-Bake Oreo Cheesecake. This delightful treat combines the classic taste of Oreos with the creamy texture of cheesecake, all without requiring an oven. Perfect for any occasion, this dessert is a crowd-pleaser that will leave everyone asking for seconds. In this article, we’ll guide you through the process of making this exquisite cheesecake, from gathering ingredients to serving it with flair.
Ingredients
Before diving into the preparation of your No-Bake Oreo Cheesecake, ensure you have all the necessary ingredients ready. Here’s what you’ll need:
- 24 Oreo cookies
- 1/4 cup melted butter
- 16 oz cream cheese, softened
- 1 cup powdered sugar
- 1 tsp vanilla extract
- 1 cup whipped cream (or whipped topping)
- Extra Oreos for topping
Instructions
Creating a No-Bake Oreo Cheesecake is a simple process that anyone can follow. The steps are easy to understand, making this a perfect recipe for beginners and seasoned bakers alike.
- Prepare the Crust:
- Crush 24 Oreo cookies in a zip-top bag or use a food processor to achieve a fine consistency.
- Mix the crushed Oreos with the melted butter until well combined.
- Press the mixture firmly into the bottom of a 9-inch springform pan to create the crust. Ensure the crust is even and compact.
- Make the Cheesecake Filling:
- In a large mixing bowl, beat the softened cream cheese until it becomes smooth and creamy.
- Gradually add the powdered sugar and vanilla extract, mixing well to ensure a smooth consistency.
- Gently fold in the whipped cream (or whipped topping) until fully combined, making sure not to deflate the airiness of the whipped cream.
- Assemble the Cheesecake:
- Spread the cream cheese mixture evenly over the prepared Oreo crust in the springform pan.
- Smooth the top with a spatula to create an even layer.
- Chill the Cheesecake:
- Place the cheesecake in the refrigerator and let it chill for at least 4 hours or until it is set. This step is crucial for achieving the perfect texture.
- Garnish and Serve:
- Before serving, top the cheesecake with extra crushed Oreos for added flavor and visual appeal.
Nutrition Facts
Understanding the nutritional content of your food is important. Here’s a breakdown of the nutritional facts for one slice of No-Bake Oreo Cheesecake, assuming the cheesecake is divided into 12 servings:
- Calories: 320
- Fat: 23g
- Carbohydrates: 30g
- Protein: 4g
How to Serve
Presentation is key when serving your No-Bake Oreo Cheesecake, as it enhances the overall dining experience and sets the tone for indulgence. Here are some detailed tips to ensure your dessert not only tastes heavenly but also makes a stunning statement on the table:
Slice with Precision
- Use a Sharp Knife: Start with a high-quality, sharp knife to ensure clean cuts. A serrated knife is particularly effective for cutting through the creamy layers without squishing the cheesecake.
- Warm the Knife: For even smoother cuts, dip your knife in hot water for a few seconds before slicing. Wipe it with a clean cloth to remove moisture and then slice through the cheesecake. This technique helps achieve a perfectly clean edge.
- Clean Between Cuts: To maintain the integrity of each slice, wipe the knife with a damp cloth or paper towel between cuts. This prevents the creamy filling from mashing together and ensures that each piece has a nice, defined shape.
Add a Dollop of Whipped Cream
- Homemade Whipped Cream: For an extra touch of freshness, consider making your own whipped cream. Simply whip heavy cream with a bit of powdered sugar and vanilla extract until soft peaks form. This not only tastes better but also allows you to control the sweetness.
- Presentation: Use a piping bag fitted with a star tip for a decorative dollop on each slice. This technique adds height and visual interest, making the dessert appear more gourmet.
- Flavor Variations: Consider adding a hint of flavor to your whipped cream by incorporating a splash of vanilla extract, a sprinkle of cocoa powder, or even a dash of coffee for a mocha twist.
Garnish with Whole Oreos
- Strategic Placement: Place a whole Oreo cookie on top of each slice, slightly offset to one side for visual appeal. This not only adds a decorative touch but also reinforces the delightful Oreo flavor.
- Crushed Oreo Crumbs: For an added layer of texture and presentation, consider sprinkling crushed Oreo crumbs around the base of the cheesecake on the serving platter. This creates a beautiful contrast and ties the theme together.
- Chocolate Drizzle: Enhance the visual impact by drizzling some melted chocolate over the top or around the plate. A combination of white and dark chocolate can create a striking effect that beckons guests to dig in.
Serve Chilled
- Optimal Temperature: Ensure your cheesecake is well-chilled before serving, ideally for at least 4-6 hours or overnight. The colder temperature enhances the creamy texture and makes it easier to slice.
- Chilled Plates: For an extra touch of sophistication, serve the cheesecake on chilled plates. You can place the plates in the refrigerator for a short time before serving. This not only keeps the dessert colder for longer but also adds a touch of elegance to your presentation.
- Accompaniments: Consider serving the cheesecake alongside a scoop of vanilla ice cream or a fruit compote. This adds a complementary flavor note and elevates the dessert experience.
By following these detailed serving tips, your No-Bake Oreo Cheesecake will not only be a culinary delight but also a feast for the eyes, making it the perfect centerpiece for any gathering. Enjoy the compliments as your guests savor each delicious bite!
Additional Tips
Enhancing your cheesecake-making experience can elevate your dessert to new heights. Here are some comprehensive tips that will help you achieve a delicious and visually appealing cheesecake:
1. Use Full-Fat Cream Cheese
For the creamiest and richest texture, it’s crucial to use full-fat cream cheese. Low-fat or fat-free options may save calories, but they often result in a cheesecake that lacks the desired creaminess and depth of flavor. Full-fat cream cheese contains more fat, which contributes to a luscious mouthfeel that is characteristic of a classic cheesecake. Moreover, the higher fat content helps the cheesecake set properly while maintaining a smooth, silky consistency.
2. Room Temperature Ingredients
Before you begin mixing your cheesecake batter, it’s essential to let your cream cheese and other dairy ingredients, such as sour cream or heavy cream, come to room temperature. This step can’t be overstated; room temperature ingredients blend more easily, which helps prevent lumps in your batter. The smoother consistency will translate into a more uniform texture in your finished cheesecake. To expedite this process, you can cut the cream cheese into smaller cubes and let it sit out for about 30 minutes prior to mixing. Alternatively, if you’re short on time, you can microwave the cream cheese in short bursts (10-15 seconds), but be careful not to melt it.
3. Customize Your Crust
While a classic graham cracker crust is a staple for many cheesecakes, don’t hesitate to get creative with your crust. Experimenting with different types of cookies can add exciting flavors and textures. For example, using chocolate sandwich cookies can create a decadent chocolate crust, while gingersnap cookies can impart a spicy warmth. If you’re feeling adventurous, consider trying flavored Oreos, such as mint or peanut butter. You can also mix in nuts, like crushed pecans or walnuts, for added crunch and flavor. Just be sure to adjust the sugar content in your crust recipe accordingly, as some cookies are sweeter than others.
4. Chill Time
Patience is key when it comes to cheesecake. While it may be tempting to cut into your cheesecake as soon as it has set, allowing it to chill in the refrigerator overnight is one of the best ways to enhance its flavor and texture. This extended chilling period allows the flavors to meld beautifully, resulting in a more cohesive taste. Additionally, it helps the cheesecake firm up, making it easier to slice and serve. If you’re in a hurry, aim for at least 4-6 hours of chilling, but overnight is ideal for the best results.
5. Use a Water Bath
For an ultra-smooth and crack-free cheesecake, consider using a water bath (bain-marie) during baking. This technique involves placing your cheesecake pan inside a larger pan filled with hot water. The water bath creates a humid environment in the oven, which helps to regulate the temperature around your cheesecake, preventing it from baking too quickly and ensuring even cooking. Wrap the bottom of your springform pan with aluminum foil to prevent water from seeping in, and bake your cheesecake at a lower temperature for a longer period to achieve that perfect, creamy texture.
6. Avoid Overmixing
When preparing your cheesecake batter, it’s important to mix just until the ingredients are combined. Overmixing can introduce too much air into the batter, which may lead to cracks during baking. Be gentle when incorporating your eggs, adding them one at a time, and mixing just until they are fully incorporated. This will help you maintain a dense, creamy texture without compromising the structural integrity of your cheesecake.
7. Flavor Variations
While traditional cheesecakes are delicious on their own, don’t hesitate to incorporate various flavorings to customize your creation. Consider adding vanilla extract, citrus zest (like lemon or orange), or even a splash of your favorite liqueur for a sophisticated twist. You can also swirl in fruit purees, chocolate ganache, or caramel sauce before baking for a visually stunning and flavorful result.
By following these tips, you can refine your cheesecake-making skills and create a dessert that is not only impressive to serve but also a delight to eat. Happy baking!
FAQs
Q: Can I use low-fat cream cheese for this recipe?
A: While you can use low-fat cream cheese, the texture may not be as rich and creamy as with full-fat cream cheese.
Q: How long can I store the No-Bake Oreo Cheesecake?
A: The cheesecake can be stored in the refrigerator for up to 5 days, covered with plastic wrap or stored in an airtight container.
Q: Can I freeze the No-Bake Oreo Cheesecake?
A: Yes, you can freeze it. Wrap the cheesecake tightly in plastic wrap and foil before freezing. Thaw in the refrigerator before serving.
Q: Can I use homemade whipped cream instead of store-bought?
A: Absolutely! Homemade whipped cream can be used and will add a fresh touch to the dessert.
Conclusion
The No-Bake Oreo Cheesecake is a testament to the fact that delicious desserts don’t have to be complicated. With its creamy filling and crunchy Oreo crust, this cheesecake is a delightful treat for any occasion. Whether you’re hosting a gathering or simply craving a sweet indulgence, this recipe is sure to satisfy. Follow the steps outlined above, and enjoy a slice (or two) of this delectable dessert. Happy baking!
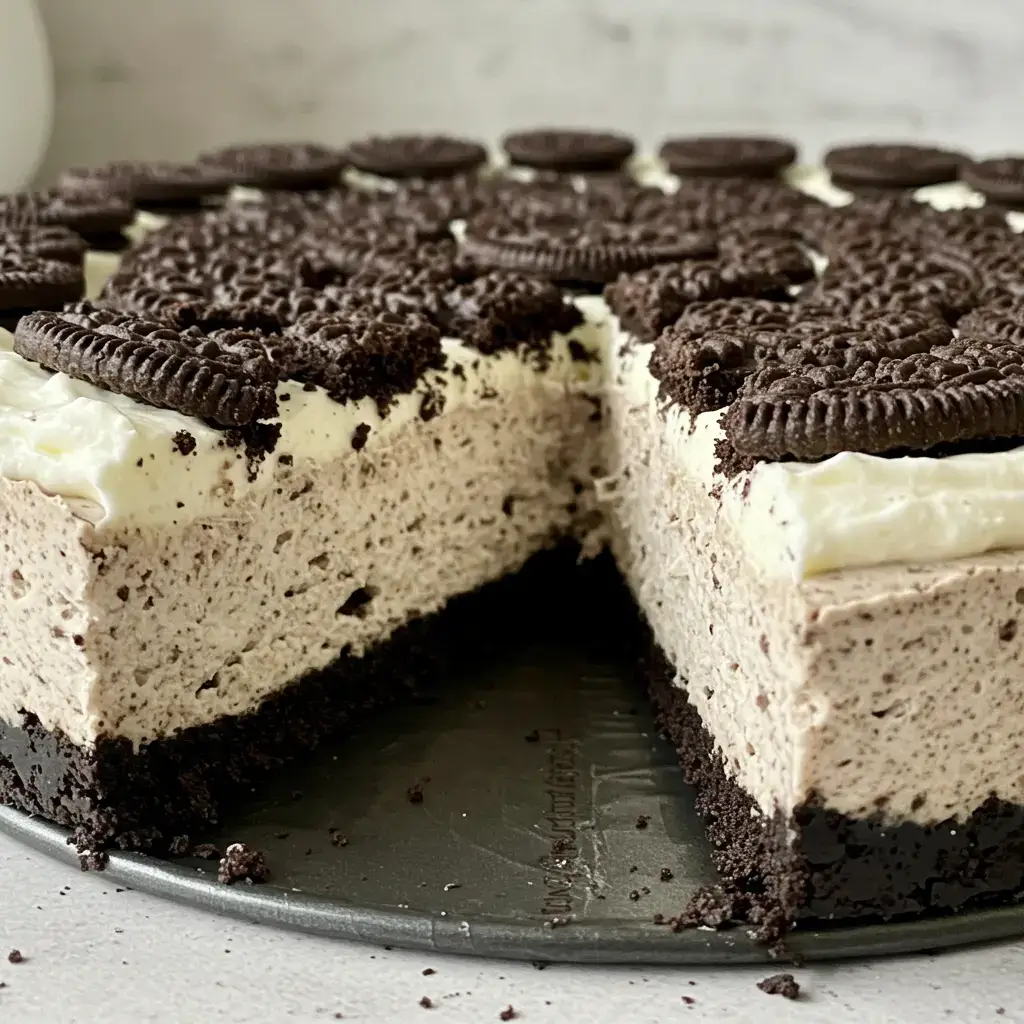
One of the most appealing aspects of the No-Bake Oreo Cheesecake is its simplicity. Without the need for an oven or intricate baking techniques, this dessert is accessible to both beginners and seasoned bakers. The combination of crushed Oreos and melted butter creates a sturdy, chocolatey crust, while the smooth, creamy cheesecake filling—infused with crushed Oreos—adds a luscious texture and rich flavor. Every bite is a delightful blend of crunch and creaminess, making it nearly impossible to stop at just one slice.
This cheesecake isn’t just about taste; it’s also a visually stunning dessert. The contrast between the dark Oreo crust and the creamy white filling, speckled with bits of Oreo, makes for an eye-catching presentation. Adding a final layer of whipped cream, additional crushed Oreos, or even whole cookies on top takes the aesthetic appeal to the next level. It’s the kind of dessert that looks as impressive as it tastes, making it perfect for birthdays, family dinners, or casual get-togethers.
Another advantage of this recipe is its versatility. While the classic Oreo flavor is always a hit, you can easily customize this cheesecake to suit different preferences. Experiment with flavored Oreos—such as mint, peanut butter, or golden Oreos—for a unique twist. You can also add layers of chocolate ganache or drizzle caramel sauce on top to elevate the dessert further. No matter how you choose to personalize it, the result will always be a deliciously indulgent treat.
In addition to being easy to make, the No-Bake Oreo Cheesecake is also a convenient dessert. It can be prepared ahead of time and stored in the refrigerator until you’re ready to serve. This makes it an ideal choice for busy hosts or anyone who wants to minimize last-minute kitchen stress. Plus, since it’s a no-bake recipe, there’s no risk of overcooking or cracking, which can sometimes happen with traditional baked cheesecakes.
The joy of slicing into a perfectly chilled Oreo cheesecake and serving it to family or friends is incredibly rewarding. The smiles and satisfied sighs that follow the first bite are proof of the magic that happens when simple ingredients come together in the right way. Whether enjoyed on a special occasion or as an everyday indulgence, this cheesecake is bound to leave a lasting impression.
In conclusion, the No-Bake Oreo Cheesecake is the perfect blend of convenience, flavor, and visual appeal. Its creamy filling, crunchy crust, and undeniable charm make it a standout dessert for any occasion. So, grab your ingredients, follow the easy steps, and treat yourself and your loved ones to this delightful creation. After all, a dessert this good deserves to be shared and savored. Enjoy every bite!
Print
No-Bake Oreo Cheesecake
Ingredients
Before diving into the preparation of your No-Bake Oreo Cheesecake, ensure you have all the necessary ingredients ready. Here’s what you’ll need:
- 24 Oreo cookies
- 1/4 cup melted butter
- 16 oz cream cheese, softened
- 1 cup powdered sugar
- 1 tsp vanilla extract
- 1 cup whipped cream (or whipped topping)
- Extra Oreos for topping
Instructions
Creating a No-Bake Oreo Cheesecake is a simple process that anyone can follow. The steps are easy to understand, making this a perfect recipe for beginners and seasoned bakers alike.
- Prepare the Crust:
- Crush 24 Oreo cookies in a zip-top bag or use a food processor to achieve a fine consistency.
- Mix the crushed Oreos with the melted butter until well combined.
- Press the mixture firmly into the bottom of a 9-inch springform pan to create the crust. Ensure the crust is even and compact.
- Make the Cheesecake Filling:
- In a large mixing bowl, beat the softened cream cheese until it becomes smooth and creamy.
- Gradually add the powdered sugar and vanilla extract, mixing well to ensure a smooth consistency.
- Gently fold in the whipped cream (or whipped topping) until fully combined, making sure not to deflate the airiness of the whipped cream.
- Assemble the Cheesecake:
- Spread the cream cheese mixture evenly over the prepared Oreo crust in the springform pan.
- Smooth the top with a spatula to create an even layer.
- Chill the Cheesecake:
- Place the cheesecake in the refrigerator and let it chill for at least 4 hours or until it is set. This step is crucial for achieving the perfect texture.
- Garnish and Serve:
- Before serving, top the cheesecake with extra crushed Oreos for added flavor and visual appeal.
Nutrition
- Serving Size: one normal portion
- Calories: 320
- Fat: 23g
- Carbohydrates: 30g
- Protein: 4g