This Sesame Honey Brittle is a revelation in simplicity and flavor. Imagine a candy that requires just a few pantry staples, yet delivers an explosion of crunchy texture and warm, nutty sweetness. Forget complicated candy-making techniques; this recipe is surprisingly straightforward, making it perfect for both beginner and experienced home cooks. The combination of toasted sesame seeds and golden honey creates a flavor profile that is both comforting and sophisticated, making it an ideal treat for snacking, gifting, or adding a delightful crunch to desserts. Whether you are looking for a homemade candy that’s naturally vegan and gluten-free, a unique and impressive edible gift, or simply a satisfyingly crunchy sweet treat to enjoy with your afternoon tea, this Sesame Honey Brittle recipe is your answer. Get ready to experience the pure joy of a perfectly crafted brittle – golden, crunchy, and utterly irresistible!
Ingredients
The beauty of Sesame Honey Brittle lies in its short and sweet ingredient list. Each component is essential for achieving the signature crunch, flavor, and beautiful golden hue. Let’s explore each ingredient in detail:
- 1 cup Sesame Seeds (White or Black, or a Mix), Untoasted: Sesame seeds are the star of this brittle, providing the nutty flavor and characteristic crunch. You have options when choosing sesame seeds:
- White Sesame Seeds: These are the most common type and offer a mild, nutty flavor that is classic in brittle. Hulled white sesame seeds are readily available and work perfectly.
- Black Sesame Seeds: For a more intense, slightly bitter, and visually striking brittle, consider using black sesame seeds. They have a bolder flavor and create a beautiful contrast against the golden caramel.
- Mixed Sesame Seeds: For a visually appealing and flavor-balanced brittle, use a mix of white and black sesame seeds. This offers the best of both worlds in terms of flavor and aesthetics.
- Untoasted: It is crucial to start with untoasted sesame seeds as you will be toasting them yourself to unlock their full flavor potential and prevent burning during the brittle-making process.
- ½ cup Granulated Sugar: Granulated sugar provides the structural backbone of the brittle. It caramelizes beautifully alongside the honey, creating the hard, crunchy texture we crave. White granulated sugar is typically used as it provides a clean sweetness that allows the sesame and honey flavors to shine.
- ½ cup Honey (Your Choice of Variety): Honey is not just a sweetener; it’s a key flavor component that contributes to the unique taste and golden color of the brittle. The type of honey you choose will significantly impact the final flavor profile. Consider these options:
- Wildflower Honey: A versatile choice offering a balanced sweetness and delicate floral notes. It’s a great all-around honey for brittle making.
- Clover Honey: Known for its mild and subtly sweet flavor, clover honey is a good option if you want the sesame flavor to be more prominent.
- Buckwheat Honey: For a bolder, more robust brittle, use buckwheat honey. It has a darker color and a molasses-like flavor that adds depth and richness. Use it sparingly if you prefer a milder taste.
- Orange Blossom Honey: Offers a fragrant and floral aroma with subtle citrusy notes. It adds a delicate sweetness and a touch of complexity to the brittle.
- Manuka Honey: While more expensive, Manuka honey imparts a unique, slightly medicinal flavor and a rich, dark color. It can be used for a truly distinctive brittle, but might overpower the sesame flavor.
- 2 tablespoons Unsalted Butter, Cut into Small Pieces: A small amount of unsalted butter adds richness, a smoother texture, and a luxurious mouthfeel to the brittle. It also helps to prevent the brittle from becoming too hard and brittle, ironically! The butter contributes to a slightly softer bite and enhances the overall flavor, making it less intensely sugary. For a vegan version, you can substitute with a high-quality vegan butter alternative.
- ¼ teaspoon Salt: Salt is a crucial ingredient for balancing the sweetness and enhancing the nutty and honey flavors. It prevents the brittle from tasting one-dimensional and overly sugary. A small amount of salt brings out the complexity of the other flavors and creates a more well-rounded taste experience.
- 1-2 tablespoons Water or Lemon Juice (Optional): Adding a tablespoon or two of water or lemon juice at the beginning of the caramelization process can be helpful.
- Water: Helps to dissolve the sugar and honey evenly, preventing crystallization and leading to a smoother, more consistent brittle.
- Lemon Juice: In addition to aiding sugar dissolution, lemon juice adds a subtle tang that can brighten the overall flavor and cut through the sweetness, creating a more balanced taste.
- Pinch of Baking Soda (Optional, for Lighter Texture): A tiny pinch of baking soda, added at the very end of cooking, can create a slightly lighter and airier texture in the brittle. It reacts with the acids in the honey and sugar, creating small bubbles that result in a more delicate crunch. Use it sparingly, as too much baking soda can impart an unpleasant soapy taste. If you prefer a denser, more intensely crunchy brittle, you can omit the baking soda.
Instructions
Creating perfect Sesame Honey Brittle is a rewarding process. Follow these detailed, step-by-step instructions to achieve that signature golden crunch every time:
- Toast the Sesame Seeds: This is a crucial step for unlocking the full flavor of the sesame seeds.
- Prepare a Dry Skillet: Place a dry skillet (cast iron or stainless steel works best) over medium heat. Ensure the skillet is completely dry before adding the seeds.
- Add Sesame Seeds: Pour the untoasted sesame seeds into the dry skillet in a single, even layer. Avoid overcrowding the pan, as this will prevent even toasting.
- Toast and Stir: Toast the sesame seeds, stirring frequently and consistently with a spatula or wooden spoon. Constant stirring is essential to prevent burning and ensure even toasting.
- Monitor Carefully: Watch the sesame seeds closely as they toast. They will start to become fragrant and lightly golden brown. This process usually takes about 5-7 minutes. Be extremely careful not to burn them, as they can go from perfectly toasted to burnt very quickly, which will impart a bitter taste to your brittle.
- Remove from Heat and Cool: As soon as the sesame seeds are fragrant and lightly golden, immediately remove the skillet from the heat. Transfer the toasted sesame seeds to a separate bowl to cool completely. This stops the cooking process and prevents residual heat from burning them. Set aside the toasted sesame seeds.
- Prepare the Baking Sheet: Proper preparation of the baking sheet is essential for easy removal and a smooth brittle surface.
- Line Baking Sheet: Line a baking sheet (a rimless baking sheet is ideal for easier spreading) with parchment paper or a silicone baking mat. Parchment paper is generally preferred for brittle as it allows for easy peeling and prevents sticking. A silicone mat can also be used, but ensure it is completely flat.
- Ensure Flat and Wrinkle-Free: Make sure the parchment paper or silicone mat is spread out completely flat on the baking sheet and is free of wrinkles or creases. This will ensure a smooth and even brittle surface.
- Combine Sugar, Honey, and Water/Lemon Juice (Optional): This step initiates the caramelization process.
- In Saucepan: In a large, heavy-bottomed saucepan (stainless steel or copper is recommended for even heat distribution), combine the granulated sugar, honey, and water or lemon juice (if using).
- Briefly Stir: Stir the ingredients briefly with a spatula or wooden spoon just to combine them. No need to overmix at this stage.
- Cook the Caramel (Crucial Step): This is the most important step for achieving the perfect brittle texture.
- Medium Heat: Place the saucepan over medium heat on your stovetop.
- Candy Thermometer (Highly Recommended): If you are using a candy thermometer, attach it to the side of the saucepan, ensuring that the bulb is submerged in the sugar-honey mixture but not touching the bottom of the pan. This will provide accurate temperature readings.
- Do Not Stir (After Initial Mixing): Once the mixture begins to heat and bubble, it is crucial not to stir it anymore. Stirring at this stage can encourage sugar crystallization, which will result in a grainy brittle texture. Let the mixture cook undisturbed.
- Monitor Color and Temperature: As the mixture cooks, it will bubble vigorously and gradually change color, starting from clear to light golden, then to a deeper amber. The temperature will rise steadily.
- Hard-Crack Stage: Continue to cook the caramel mixture until it reaches the “hard-crack” stage. This is when the temperature reaches 300-310°F (149-154°C) on a candy thermometer. The hard-crack stage is essential for achieving the brittle’s signature crunch.
- Cold Water Test (If No Thermometer): If you don’t have a candy thermometer, you can use the “cold water test” to determine when the caramel is ready. Keep a heatproof bowl of ice water nearby. Carefully drop a very small spoonful of the caramel into the ice water.
- Hard-Crack Achieved: If the caramel immediately hardens into a brittle thread that snaps cleanly and easily when you bend it, it has reached the hard-crack stage and is ready.
- Needs More Cooking: If the caramel forms a soft, chewy ball or a soft, bendable thread in the cold water, it needs to cook longer to reach the hard-crack stage. Continue cooking and testing every minute or two until the hard-crack stage is reached.
- Remove from Heat and Add Butter, Salt, Baking Soda (Optional): Timing is key in this step.
- Immediately Remove from Heat: As soon as the caramel reaches the hard-crack stage (or passes the cold water test), immediately remove the saucepan from the heat source. This is crucial to prevent overcooking and burning the caramel.
- Quickly Stir in Butter and Salt: Add the butter pieces and salt to the hot caramel mixture. Stir quickly and thoroughly with a spatula or wooden spoon until the butter is completely melted and fully incorporated into the caramel. The mixture will likely foam up slightly as the butter melts.
- Add Baking Soda (Optional): If you are using baking soda for a lighter texture, add it now (a tiny pinch). Stir quickly and thoroughly to combine it evenly throughout the caramel mixture. The mixture will foam up further and become slightly lighter in color as the baking soda reacts with the acids in the caramel. Be careful not to add too much baking soda, as it can impart a soapy taste if overused.
- Stir in Toasted Sesame Seeds: Work swiftly in this step.
- Pour in Toasted Sesame Seeds: Immediately pour the toasted and cooled sesame seeds into the hot caramel mixture in the saucepan.
- Stir Quickly and Thoroughly: Stir quickly and thoroughly with a spatula or wooden spoon to ensure that all the toasted sesame seeds are evenly coated with the hot caramel. Work rapidly, as the caramel will begin to harden and set as it cools down.
- Spread Brittle onto Baking Sheet (Work Quickly): Speed is essential in this step to spread the brittle before it sets.
- Pour onto Baking Sheet: Immediately pour the sesame seed and caramel mixture onto the prepared parchment-lined baking sheet.
- Spread Thinly and Evenly: Using a heatproof spatula or an offset spatula, quickly spread the mixture into a thin, even layer on the baking sheet. The thinner you spread the brittle, the crunchier it will be. Aim for a consistent thickness across the sheet.
- Rustic Look is Fine: Don’t worry about achieving perfect evenness; a slightly rustic, uneven look is part of the charm of homemade brittle. Focus on spreading it thinly and relatively evenly.
- Cool and Break into Pieces: Patience is required for proper cooling and setting.
- Cool Completely at Room Temperature: Let the Sesame Honey Brittle cool completely at room temperature on the baking sheet. This cooling process is crucial for the brittle to harden and become perfectly crisp. Allow at least 30-60 minutes for complete cooling, or until it is firm to the touch and snaps easily when broken. Do not refrigerate the brittle to speed up cooling, as moisture in the refrigerator can make it sticky.
- Break into Pieces: Once the brittle is completely cooled and hardened, you can break it into irregular pieces. You can gently break it apart with your hands, or you can use the handle of a knife or a kitchen mallet to tap lightly and break it into pieces. Break it into pieces of your desired size and shape.
- Store Properly (Important for Crispness): Proper storage is essential to maintain the brittle’s signature crunch.
- Airtight Container: Store the cooled and broken Sesame Honey Brittle in an airtight container at room temperature. An airtight container is critical for preventing moisture from getting to the brittle and making it sticky or soft.
- Room Temperature Storage: Store it at room temperature and avoid storing it in the refrigerator, as refrigeration can introduce moisture and make the brittle lose its crispness.
- Layer with Parchment (Optional): If you are storing multiple layers of brittle in the container, you can place sheets of parchment paper between the layers to prevent them from sticking together.
- Enjoy Within a Week or Two: While properly stored Sesame Honey Brittle can last for a couple of weeks, it is best enjoyed within a week or two for optimal crispness and flavor.
Nutrition Facts (per serving)
(Please note: Nutritional information is an estimate and can vary based on specific ingredients used, honey variety, and serving size.)
Servings: Approximately 24 pieces (depending on how you break it)
Estimated Calories per serving (1 piece): 100-150 calories
Approximate Nutritional Breakdown (per serving):
- Fat: 5-8g (Primarily from sesame seeds and butter)
- Saturated Fat: 2-4g
- Cholesterol: 5-10mg
Sesame Honey Brittle is a treat and should be consumed in moderation as part of a balanced diet. The calorie content is mainly derived from sugar, honey, and sesame seeds. While sesame seeds offer some nutritional benefits, this candy is primarily a source of carbohydrates and fats.
Preparation Time
Sesame Honey Brittle is relatively quick to prepare, though cooling time is essential for achieving the desired crunch. Here’s a time breakdown:
- Prep Time: 15 minutes (This includes toasting sesame seeds, measuring ingredients, and preparing the baking sheet.)
- Cook Time: 20-25 minutes (Caramelizing the sugar and honey, reaching the hard-crack stage.)
- Cooling Time: 30-60 minutes (For brittle to fully harden and crisp at room temperature)
Total Active Time: Approximately 35-40 minutes
Total Time (including cooling): Approximately 1 hour 5 minutes – 1 hour 25 minutes
The active preparation and cooking time are relatively short, making this recipe achievable even on a busy day. The majority of the time is passive cooling time, where you simply need to allow the brittle to set undisturbed.
How to Serve
Sesame Honey Brittle is incredibly versatile and can be enjoyed in numerous ways. Its delightful crunch and sweet-nutty flavor make it a welcome addition to various occasions. Here are some serving suggestions:
- Simple Snacking:
- Straight from the Jar: The most straightforward way to enjoy Sesame Honey Brittle is to simply break off pieces and snack on them directly from the airtight container whenever you crave a sweet and crunchy treat.
- Afternoon Treat: Pair a few pieces of brittle with a cup of coffee, tea (especially green tea or black tea), or a glass of milk for a satisfying afternoon pick-me-up.
- Dessert Enhancements:
- Ice Cream Topping: Crumble Sesame Honey Brittle into smaller pieces and sprinkle them over vanilla ice cream, chocolate ice cream, or frozen yogurt for added crunch and flavor complexity.
- Yogurt Parfaits: Layer crumbled brittle into yogurt parfaits with fresh fruit and granola for a textural and flavorful breakfast or dessert.
- Cake and Cupcake Decoration: Use larger, more decorative pieces of brittle to adorn cakes, cupcakes, or pies, adding visual appeal and a delightful crunch.
- Gifting and Entertaining:
- Homemade Gifts: Package broken pieces of Sesame Honey Brittle in cellophane bags tied with ribbons, decorative tins, or mason jars for thoughtful and impressive homemade gifts for holidays, birthdays, thank you gestures, or hostess gifts.
- Party Favors: Create small bags of brittle as unique and delicious party favors for weddings, birthdays, or other celebrations.
- Dessert Platter Addition: Include Sesame Honey Brittle on a dessert platter alongside other sweets like cookies, brownies, chocolates, and fresh fruits for a diverse and appealing spread.
- Cheese Board Contrast: Surprisingly, Sesame Honey Brittle can be a delightful and unexpected addition to a cheese board. The sweet and salty contrast with creamy cheeses like brie, goat cheese, or blue cheese is surprisingly delicious and sophisticated.
- Creative Culinary Uses:
- Salad Topping: For a surprising textural element, crumble a small amount of Sesame Honey Brittle over a green salad with a vinaigrette dressing. The sweet and salty crunch adds an unexpected dimension.
- Trail Mix Addition: Break brittle into small pieces and incorporate it into homemade trail mix for added sweetness and crunch alongside nuts, dried fruits, and seeds.
Additional Tips for Perfect Sesame Honey Brittle
To consistently achieve flawless Sesame Honey Brittle with that signature golden crunch, keep these five essential tips in mind:
- Toast Sesame Seeds to Perfection: Proper toasting is non-negotiable. Don’t rush this step. Toast the sesame seeds slowly and evenly in a dry skillet, stirring constantly until they are fragrant and lightly golden. Watch them carefully to prevent burning, as burnt sesame seeds will ruin the flavor of your brittle.
- Invest in a Candy Thermometer: While the cold water test is a helpful technique, a candy thermometer is the most reliable tool for achieving the hard-crack stage accurately. Temperature control is paramount for brittle success. A candy thermometer eliminates guesswork and ensures consistent results every time.
- Don’t Stir the Caramel (After Initial Mixing): Resist the urge to stir the caramel mixture once it starts heating and bubbling (after the initial brief mixing). Stirring can introduce sugar crystals and lead to a grainy, less crisp brittle. Let the caramel cook undisturbed until it reaches the hard-crack stage.
- Work Quickly After Caramel is Ready: Once the caramel reaches the hard-crack stage and you remove it from the heat, you need to work swiftly. The caramel will begin to set and harden rapidly as it cools. Have your baking sheet and spatula ready, and spread the mixture onto the parchment paper as quickly and evenly as possible.
- Store Brittle Properly for Crispness: Moisture is the enemy of brittle. To maintain its signature crunch, store your Sesame Honey Brittle in an airtight container at room temperature. Avoid storing it in the refrigerator, as condensation can make it sticky and lose its crispness. Ensure the container is tightly sealed to prevent any moisture from entering.
Frequently Asked Questions (FAQs)
Here are answers to some common questions about making Sesame Honey Brittle, helping you troubleshoot and achieve brittle-making success:
Q1: My brittle is sticky and not crunchy. What went wrong?
A: Sticky brittle is usually caused by:
- Under-cooking the Caramel: The caramel did not reach the hard-crack stage (300-310°F or the brittle, snapping thread in cold water test). It needs to be cooked longer to remove more moisture and achieve a harder set.
- Humid Weather: High humidity can make brittle absorb moisture from the air, leading to stickiness. If you live in a humid climate, try making brittle on a drier day, or ensure your kitchen is well-ventilated.
- Improper Storage: If brittle is not stored in an airtight container, it will absorb moisture and become sticky over time. Always store it in a tightly sealed container at room temperature.
Q2: My brittle burned. How can I prevent this in the future?
A: Burnt brittle is usually due to:
- Overcooking the Caramel: The caramel was cooked beyond the hard-crack stage and became too dark and bitter. Use a candy thermometer to accurately monitor the temperature and remove it from heat as soon as it reaches 300-310°F.
- Too High Heat: Cooking the caramel over too high heat can cause it to burn quickly. Use medium heat and monitor the caramel closely, especially as it approaches the hard-crack stage.
- Burnt Sesame Seeds: If you burned the sesame seeds during the toasting step, this will also contribute to a burnt flavor in the brittle. Toast sesame seeds gently and watch them carefully.
Q3: Can I make Sesame Honey Brittle without a candy thermometer?
A: Yes, you can make Sesame Honey Brittle without a candy thermometer using the cold water test. However, a candy thermometer provides much more precise and consistent results. If using the cold water test, be sure to test frequently as the caramel approaches the hard-crack stage and be very attentive to the visual cues (color change) as well.
Q4: Can I add other ingredients to Sesame Honey Brittle?
A: Absolutely! Sesame Honey Brittle is a versatile base recipe. You can add:
- Nuts: Chopped almonds, peanuts, pecans, cashews, or a mix of nuts. Add them along with the sesame seeds.
- Spices: Ground cinnamon, ginger, cardamom, or a pinch of chili flakes for a spiced brittle. Add spices to the caramel mixture in the last minute of cooking.
- Citrus Zest: Orange, lemon, or lime zest for a bright citrus note. Add zest to the caramel mixture in the last minute of cooking.
- Chocolate: Drizzle melted chocolate over the cooled brittle for a decadent touch.
Q5: Is Sesame Honey Brittle vegan and gluten-free?
A: Yes, Sesame Honey Brittle is naturally vegan and gluten-free when made with the standard ingredients: sesame seeds, sugar, honey, salt, and optional vegan butter and baking soda. Ensure you use vegan butter if making a vegan version. Honey is generally considered vegan by some but not all vegans, so if strict veganism is a concern, you might explore alternative sweeteners like agave nectar or maple syrup (though this will alter the flavor and texture and may require recipe adjustments). Sesame seeds are naturally gluten-free, as is granulated sugar and honey.
Print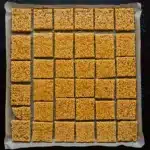
Sesame Honey Brittle
- Total Time: 1 hour 25 minutes
Ingredients
The beauty of Sesame Honey Brittle lies in its short and sweet ingredient list. Each component is essential for achieving the signature crunch, flavor, and beautiful golden hue. Let’s explore each ingredient in detail:
- 1 cup Sesame Seeds (White or Black, or a Mix), Untoasted: Sesame seeds are the star of this brittle, providing the nutty flavor and characteristic crunch. You have options when choosing sesame seeds:
- White Sesame Seeds: These are the most common type and offer a mild, nutty flavor that is classic in brittle. Hulled white sesame seeds are readily available and work perfectly.
- Black Sesame Seeds: For a more intense, slightly bitter, and visually striking brittle, consider using black sesame seeds. They have a bolder flavor and create a beautiful contrast against the golden caramel.
- Mixed Sesame Seeds: For a visually appealing and flavor-balanced brittle, use a mix of white and black sesame seeds. This offers the best of both worlds in terms of flavor and aesthetics.
- Untoasted: It is crucial to start with untoasted sesame seeds as you will be toasting them yourself to unlock their full flavor potential and prevent burning during the brittle-making process.
- ½ cup Granulated Sugar: Granulated sugar provides the structural backbone of the brittle. It caramelizes beautifully alongside the honey, creating the hard, crunchy texture we crave. White granulated sugar is typically used as it provides a clean sweetness that allows the sesame and honey flavors to shine.
- ½ cup Honey (Your Choice of Variety): Honey is not just a sweetener; it’s a key flavor component that contributes to the unique taste and golden color of the brittle. The type of honey you choose will significantly impact the final flavor profile. Consider these options:
- Wildflower Honey: A versatile choice offering a balanced sweetness and delicate floral notes. It’s a great all-around honey for brittle making.
- Clover Honey: Known for its mild and subtly sweet flavor, clover honey is a good option if you want the sesame flavor to be more prominent.
- Buckwheat Honey: For a bolder, more robust brittle, use buckwheat honey. It has a darker color and a molasses-like flavor that adds depth and richness. Use it sparingly if you prefer a milder taste.
- Orange Blossom Honey: Offers a fragrant and floral aroma with subtle citrusy notes. It adds a delicate sweetness and a touch of complexity to the brittle.
- Manuka Honey: While more expensive, Manuka honey imparts a unique, slightly medicinal flavor and a rich, dark color. It can be used for a truly distinctive brittle, but might overpower the sesame flavor.
Experiment with different honey varieties to discover your favorite flavor combination for Sesame Honey Brittle!
- 2 tablespoons Unsalted Butter, Cut into Small Pieces: A small amount of unsalted butter adds richness, a smoother texture, and a luxurious mouthfeel to the brittle. It also helps to prevent the brittle from becoming too hard and brittle, ironically! The butter contributes to a slightly softer bite and enhances the overall flavor, making it less intensely sugary. For a vegan version, you can substitute with a high-quality vegan butter alternative.
- ¼ teaspoon Salt: Salt is a crucial ingredient for balancing the sweetness and enhancing the nutty and honey flavors. It prevents the brittle from tasting one-dimensional and overly sugary. A small amount of salt brings out the complexity of the other flavors and creates a more well-rounded taste experience.
- 1-2 tablespoons Water or Lemon Juice (Optional): Adding a tablespoon or two of water or lemon juice at the beginning of the caramelization process can be helpful.
- Water: Helps to dissolve the sugar and honey evenly, preventing crystallization and leading to a smoother, more consistent brittle.
- Lemon Juice: In addition to aiding sugar dissolution, lemon juice adds a subtle tang that can brighten the overall flavor and cut through the sweetness, creating a more balanced taste.
- Pinch of Baking Soda (Optional, for Lighter Texture): A tiny pinch of baking soda, added at the very end of cooking, can create a slightly lighter and airier texture in the brittle. It reacts with the acids in the honey and sugar, creating small bubbles that result in a more delicate crunch. Use it sparingly, as too much baking soda can impart an unpleasant soapy taste. If you prefer a denser, more intensely crunchy brittle, you can omit the baking soda.
Instructions
Creating perfect Sesame Honey Brittle is a rewarding process. Follow these detailed, step-by-step instructions to achieve that signature golden crunch every time:
- Toast the Sesame Seeds: This is a crucial step for unlocking the full flavor of the sesame seeds.
- Prepare a Dry Skillet: Place a dry skillet (cast iron or stainless steel works best) over medium heat. Ensure the skillet is completely dry before adding the seeds.
- Add Sesame Seeds: Pour the untoasted sesame seeds into the dry skillet in a single, even layer. Avoid overcrowding the pan, as this will prevent even toasting.
- Toast and Stir: Toast the sesame seeds, stirring frequently and consistently with a spatula or wooden spoon. Constant stirring is essential to prevent burning and ensure even toasting.
- Monitor Carefully: Watch the sesame seeds closely as they toast. They will start to become fragrant and lightly golden brown. This process usually takes about 5-7 minutes. Be extremely careful not to burn them, as they can go from perfectly toasted to burnt very quickly, which will impart a bitter taste to your brittle.
- Remove from Heat and Cool: As soon as the sesame seeds are fragrant and lightly golden, immediately remove the skillet from the heat. Transfer the toasted sesame seeds to a separate bowl to cool completely. This stops the cooking process and prevents residual heat from burning them. Set aside the toasted sesame seeds.
- Prepare the Baking Sheet: Proper preparation of the baking sheet is essential for easy removal and a smooth brittle surface.
- Line Baking Sheet: Line a baking sheet (a rimless baking sheet is ideal for easier spreading) with parchment paper or a silicone baking mat. Parchment paper is generally preferred for brittle as it allows for easy peeling and prevents sticking. A silicone mat can also be used, but ensure it is completely flat.
- Ensure Flat and Wrinkle-Free: Make sure the parchment paper or silicone mat is spread out completely flat on the baking sheet and is free of wrinkles or creases. This will ensure a smooth and even brittle surface.
- Combine Sugar, Honey, and Water/Lemon Juice (Optional): This step initiates the caramelization process.
- In Saucepan: In a large, heavy-bottomed saucepan (stainless steel or copper is recommended for even heat distribution), combine the granulated sugar, honey, and water or lemon juice (if using).
- Briefly Stir: Stir the ingredients briefly with a spatula or wooden spoon just to combine them. No need to overmix at this stage.
- Cook the Caramel (Crucial Step): This is the most important step for achieving the perfect brittle texture.
- Medium Heat: Place the saucepan over medium heat on your stovetop.
- Candy Thermometer (Highly Recommended): If you are using a candy thermometer, attach it to the side of the saucepan, ensuring that the bulb is submerged in the sugar-honey mixture but not touching the bottom of the pan. This will provide accurate temperature readings.
- Do Not Stir (After Initial Mixing): Once the mixture begins to heat and bubble, it is crucial not to stir it anymore. Stirring at this stage can encourage sugar crystallization, which will result in a grainy brittle texture. Let the mixture cook undisturbed.
- Monitor Color and Temperature: As the mixture cooks, it will bubble vigorously and gradually change color, starting from clear to light golden, then to a deeper amber. The temperature will rise steadily.
- Hard-Crack Stage: Continue to cook the caramel mixture until it reaches the “hard-crack” stage. This is when the temperature reaches 300-310°F (149-154°C) on a candy thermometer. The hard-crack stage is essential for achieving the brittle’s signature crunch.
- Cold Water Test (If No Thermometer): If you don’t have a candy thermometer, you can use the “cold water test” to determine when the caramel is ready. Keep a heatproof bowl of ice water nearby. Carefully drop a very small spoonful of the caramel into the ice water.
- Hard-Crack Achieved: If the caramel immediately hardens into a brittle thread that snaps cleanly and easily when you bend it, it has reached the hard-crack stage and is ready.
- Needs More Cooking: If the caramel forms a soft, chewy ball or a soft, bendable thread in the cold water, it needs to cook longer to reach the hard-crack stage. Continue cooking and testing every minute or two until the hard-crack stage is reached.
- Remove from Heat and Add Butter, Salt, Baking Soda (Optional): Timing is key in this step.
- Immediately Remove from Heat: As soon as the caramel reaches the hard-crack stage (or passes the cold water test), immediately remove the saucepan from the heat source. This is crucial to prevent overcooking and burning the caramel.
- Quickly Stir in Butter and Salt: Add the butter pieces and salt to the hot caramel mixture. Stir quickly and thoroughly with a spatula or wooden spoon until the butter is completely melted and fully incorporated into the caramel. The mixture will likely foam up slightly as the butter melts.
- Add Baking Soda (Optional): If you are using baking soda for a lighter texture, add it now (a tiny pinch). Stir quickly and thoroughly to combine it evenly throughout the caramel mixture. The mixture will foam up further and become slightly lighter in color as the baking soda reacts with the acids in the caramel. Be careful not to add too much baking soda, as it can impart a soapy taste if overused.
- Stir in Toasted Sesame Seeds: Work swiftly in this step.
- Pour in Toasted Sesame Seeds: Immediately pour the toasted and cooled sesame seeds into the hot caramel mixture in the saucepan.
- Stir Quickly and Thoroughly: Stir quickly and thoroughly with a spatula or wooden spoon to ensure that all the toasted sesame seeds are evenly coated with the hot caramel. Work rapidly, as the caramel will begin to harden and set as it cools down.
- Spread Brittle onto Baking Sheet (Work Quickly): Speed is essential in this step to spread the brittle before it sets.
- Pour onto Baking Sheet: Immediately pour the sesame seed and caramel mixture onto the prepared parchment-lined baking sheet.
- Spread Thinly and Evenly: Using a heatproof spatula or an offset spatula, quickly spread the mixture into a thin, even layer on the baking sheet. The thinner you spread the brittle, the crunchier it will be. Aim for a consistent thickness across the sheet.
- Rustic Look is Fine: Don’t worry about achieving perfect evenness; a slightly rustic, uneven look is part of the charm of homemade brittle. Focus on spreading it thinly and relatively evenly.
- Cool and Break into Pieces: Patience is required for proper cooling and setting.
- Cool Completely at Room Temperature: Let the Sesame Honey Brittle cool completely at room temperature on the baking sheet. This cooling process is crucial for the brittle to harden and become perfectly crisp. Allow at least 30-60 minutes for complete cooling, or until it is firm to the touch and snaps easily when broken. Do not refrigerate the brittle to speed up cooling, as moisture in the refrigerator can make it sticky.
- Break into Pieces: Once the brittle is completely cooled and hardened, you can break it into irregular pieces. You can gently break it apart with your hands, or you can use the handle of a knife or a kitchen mallet to tap lightly and break it into pieces. Break it into pieces of your desired size and shape.
- Store Properly (Important for Crispness): Proper storage is essential to maintain the brittle’s signature crunch.
- Airtight Container: Store the cooled and broken Sesame Honey Brittle in an airtight container at room temperature. An airtight container is critical for preventing moisture from getting to the brittle and making it sticky or soft.
- Room Temperature Storage: Store it at room temperature and avoid storing it in the refrigerator, as refrigeration can introduce moisture and make the brittle lose its crispness.
- Layer with Parchment (Optional): If you are storing multiple layers of brittle in the container, you can place sheets of parchment paper between the layers to prevent them from sticking together.
- Enjoy Within a Week or Two: While properly stored Sesame Honey Brittle can last for a couple of weeks, it is best enjoyed within a week or two for optimal crispness and flavor.
- Prep Time: 15
- Cook Time: 25
Nutrition
- Serving Size: one normal portion
- Calories: 150
- Fat: 8g
- Saturated Fat: 4g
- Cholesterol: 10mg