Garlic breadsticks are a beloved addition to many meals, offering a delicious combination of soft, fluffy bread with the irresistible taste of garlic butter and herbs. Whether you’re serving them as a side dish, appetizer, or snack, these breadsticks are sure to please any crowd. In this comprehensive guide, we’ll dive into everything you need to know about making the perfect garlic breadsticks at home.
Introduction
Garlic breadsticks have a special place in the hearts of many food enthusiasts. Their soft, chewy texture combined with the savory flavor of garlic and herbs makes them an ideal accompaniment to a variety of dishes. Whether you’re planning a cozy dinner at home, hosting a party, or simply craving a comforting snack, garlic breadsticks are a versatile and crowd-pleasing choice.
In this article, we will walk you through the process of making garlic breadsticks from scratch. From gathering the right ingredients to perfecting your technique, you’ll find all the tips and tricks you need to create these delicious treats in your own kitchen.
Ingredients
To make garlic breadsticks, you’ll need a few simple ingredients, most of which you probably already have in your pantry. Here’s what you’ll need:
- Bread Flour: 3 cups
- Warm Water: 1 cup (around 110°F)
- Active Dry Yeast: 2 ¼ teaspoons
- Sugar: 1 tablespoon
- Salt: 1 teaspoon
- Olive Oil: 2 tablespoons
- Unsalted Butter: ¼ cup (melted)
- Garlic: 3-4 cloves (minced)
- Fresh Parsley: 2 tablespoons (finely chopped)
- Dried Oregano: 1 teaspoon
- Grated Parmesan Cheese: ¼ cup (optional)
Instructions
Creating garlic breadsticks at home is a rewarding process that involves a few key steps. Follow these instructions to achieve the perfect soft and flavorful breadsticks:
Preparing the Dough
- Activate the Yeast: In a small bowl, combine the warm water, sugar, and active dry yeast. Stir gently and let it sit for about 5-10 minutes until it becomes frothy.
- Mix the Dry Ingredients: In a large mixing bowl, combine the bread flour and salt.
- Combine Wet and Dry Ingredients: Make a well in the center of the flour mixture and pour in the yeast mixture and olive oil. Mix until a dough begins to form.
- Knead the Dough: Transfer the dough to a floured surface and knead for about 8-10 minutes until it is smooth and elastic. If the dough is too sticky, add a little more flour as needed.
- Let the Dough Rise: Place the kneaded dough in a lightly oiled bowl, cover it with a clean kitchen towel, and let it rise in a warm place for about 1-2 hours or until it has doubled in size.
Shaping and Baking the Breadsticks
- Preheat the Oven: Preheat your oven to 400°F (200°C) and line a baking sheet with parchment paper.
- Shape the Breadsticks: Once the dough has risen, punch it down to release the air. Divide it into 12 equal pieces. Roll each piece into a log shape, about 8-10 inches long, and place them on the prepared baking sheet.
- Brush with Garlic Butter: In a small bowl, mix the melted butter, minced garlic, chopped parsley, and dried oregano. Brush this mixture generously over each breadstick.
- Bake: Place the breadsticks in the preheated oven and bake for 15-20 minutes or until they are golden brown.
- Add Final Touches: If desired, sprinkle grated Parmesan cheese over the hot breadsticks as soon as they come out of the oven for an extra layer of flavor.
Nutrition Facts
While garlic breadsticks are a delicious treat, it’s important to be mindful of their nutritional content, especially if you’re watching your calorie or sodium intake. Here’s a rough estimate of the nutrition facts for one garlic breadstick (based on 12 servings):
- Calories: 150
- Total Fat: 6g
- Saturated Fat: 3g
- Cholesterol: 15mg
Note: The actual nutritional content may vary based on the exact ingredients and portion sizes you use.
How to Serve
Garlic breadsticks are not only a delicious treat but also a versatile addition to many meals. Their warm, buttery flavor and delightful aroma make them a favorite among both children and adults. Here are some comprehensive serving suggestions to elevate your garlic breadsticks experience and inspire your culinary creativity:
As a Side Dish
Garlic breadsticks are an excellent accompaniment to a variety of dishes. Their robust flavor complements many cuisines, making them a perfect side for:
- Pasta Dishes: Whether you’re serving spaghetti with marinara, fettuccine Alfredo, or a rich lasagna, garlic breadsticks provide the perfect vehicle for mopping up sauces. Their texture contrasts beautifully with the soft pasta, creating a satisfying dining experience.
- Soups: Pair garlic breadsticks with hearty soups like minestrone, creamy tomato bisque, or potato chowder. The crunchiness of the breadsticks adds a delightful crunch that balances the smoothness of the soup, making each bite more enjoyable.
- Salads: Serve garlic breadsticks alongside a fresh garden salad or a Caesar salad. The flavors of garlic and herbs in the breadsticks enhance the freshness of the greens, while the carbs help to make the meal more filling.
With Dips
Transform your garlic breadsticks into a tasty appetizer by serving them with a variety of dips. This approach adds an interactive element to your meal and allows guests to customize their flavors. Some popular dip options include:
- Marinara Sauce: This classic pairing is a crowd-pleaser. The bright acidity of the marinara cuts through the richness of the garlic butter, creating a harmonious balance of flavors that enhances the overall experience.
- Cheese Dip: Melted cheese dips, such as a creamy cheddar or a zesty pepper jack, are perfect for dipping. The gooey texture of melted cheese combined with the crunchy exterior of the breadsticks creates a delightful contrast.
- Garlic Aioli: For a gourmet touch, serve garlic breadsticks with homemade garlic aioli. The creamy and garlicky dip intensifies the flavor of the breadsticks and adds a luxurious element to your appetizer spread.
- Pesto: A vibrant basil pesto offers a refreshing twist. The herbal notes of the pesto complement the garlic in the breadsticks, making for a deliciously aromatic pairing that is perfect for summer gatherings.
For Breakfast
Garlic breadsticks can easily transition from a dinner side to a breakfast staple. Here are some ideas for incorporating them into your morning routine:
- With Scrambled Eggs: Serve garlic breadsticks alongside fluffy scrambled eggs. The savory garlic flavor complements the richness of the eggs, creating a satisfying breakfast that’s both filling and delicious.
- With a Hearty Omelet: Pair breadsticks with an omelet loaded with vegetables, cheese, and meats. The crispy breadsticks add texture and flavor to the meal, making it a more balanced option.
- As a Breakfast Sandwich: Slice the breadsticks in half and fill them with a mixture of eggs, cheese, and your choice of breakfast meats. This creative twist transforms the humble breadstick into a portable breakfast sandwich that’s perfect for those on the go.
As a Snack
Garlic breadsticks are a delightful snack option that can be enjoyed at any time of the day. Here are some ways to savor them:
- On Their Own: Simply enjoy garlic breadsticks as they are, fresh out of the oven. Their rich flavor and satisfying crunch make for a perfect snack that can be enjoyed any time you crave something savory.
- With a Side of Olives or Pickles: For a more substantial snack, serve garlic breadsticks with a small platter of olives or pickles. The briny flavors contrast beautifully with the garlic and butter, elevating your snacking experience.
- As Part of a Charcuterie Board: Incorporate garlic breadsticks into a charcuterie board. Pair them with a variety of cheeses, cured meats, nuts, and seasonal fruits. The breadsticks provide a crunchy element that balances the richness of the other components, making it a visually appealing and delicious spread for gatherings.
By incorporating these serving suggestions, you can elevate your garlic breadsticks from a simple side to a versatile culinary delight that complements a range of meals and occasions. Whether you’re hosting a dinner party or enjoying a cozy breakfast at home, garlic breadsticks are sure to impress and satisfy.
Additional Tips
To enhance your garlic breadstick-making experience and ensure they are as delicious as possible, consider the following comprehensive tips:
1. Use Fresh Ingredients
When it comes to garlic breadsticks, the quality of your ingredients can make a significant difference in flavor and texture. Opt for fresh garlic cloves instead of garlic powder to achieve that robust, aromatic taste that only fresh garlic can provide. Similarly, using fresh herbs like parsley, basil, or oregano will elevate your breadsticks, adding vibrant flavor and a touch of freshness. Dried herbs can lack the potency and aroma of their fresh counterparts, so whenever possible, choose fresh options to enhance the overall taste of your dish.
2. Experiment with Flavors
Don’t be afraid to get creative with your garlic butter mixture! While a classic combination of garlic and parsley is always a winner, you can customize your mixture to suit your taste preferences. Consider adding:
- Herbs: Fresh rosemary or thyme can lend an earthy, aromatic quality to your breadsticks. Chopped chives or dill can also add a unique twist.
- Spices: A pinch of red pepper flakes can introduce a delightful heat, while smoked paprika can add depth and a hint of smokiness. For a more exotic flavor, try incorporating a bit of za’atar or Italian seasoning.
- Cheese: Mixing in grated parmesan or mozzarella into the butter before spreading it on the dough can create a cheesy, indulgent element that complements the garlic beautifully.
- Citrus Zest: A bit of lemon or lime zest can brighten the flavors and provide a refreshing contrast to the richness of the butter and garlic.
Feel free to blend and match these ingredients to discover your perfect combination!
3. Make Ahead
If you’re preparing for a gathering or simply want to streamline your cooking process, consider making the dough in advance. You can prepare the dough and then refrigerate it overnight, which allows the flavors to meld and develop further. When you’re ready to bake, simply take the dough out of the refrigerator and let it come to room temperature for about 30 minutes before shaping and baking. This not only saves time but can also enhance the flavor and texture of your breadsticks.
4. Freezing for Future Enjoyment
Garlic breadsticks are an excellent item to have on hand for impromptu gatherings or cozy nights in. To freeze, allow your baked breadsticks to cool completely. Wrap them individually in aluminum foil to prevent freezer burn and store them in a resealable freezer bag. When you’re ready to enjoy them, simply preheat your oven to 350°F (175°C), unwrap the breadsticks, and place them on a baking sheet. Heat for about 10-15 minutes or until warmed through and slightly crisp on the outside. This way, you can savor the deliciousness of homemade garlic breadsticks any time you crave them!
5. Serve with Dipping Sauces
Elevate your garlic breadsticks even further by pairing them with complementary dipping sauces. A marinara sauce, pesto, or even a creamy garlic dip can add a new dimension of flavor. Consider making a simple garlic aioli by mixing mayonnaise with minced garlic, lemon juice, and a pinch of salt for a rich, creamy dip that enhances the garlic flavor. This not only enhances the eating experience but also gives your guests a fun and interactive element as they dip away!
6. Perfecting the Texture
For breadsticks with a delightful texture, consider brushing the tops with a bit of olive oil or melted butter before baking. This helps to achieve a golden, crispy exterior while keeping the insides soft and fluffy. Additionally, if you prefer a more rustic look, don’t worry about making them perfectly uniform in size; slight variations can add character and charm to your breadsticks.
By incorporating these tips into your garlic breadstick-making process, you can create a batch that not only impresses but also delights the palate, making your culinary efforts truly rewarding. Whether for a casual weeknight dinner or a festive gathering, these breadsticks are sure to be a hit!
FAQs
Q: Can I use all-purpose flour instead of bread flour?
A: Yes, you can use all-purpose flour, but bread flour will give you a chewier texture due to its higher protein content.
Q: How do I store leftover breadsticks?
A: Store leftover breadsticks in an airtight container at room temperature for up to 2 days. For longer storage, freeze them as mentioned above.
Q: Can I make these breadsticks gluten-free?
A: Yes, you can substitute the bread flour with a gluten-free flour blend. Be sure to choose a blend that is suitable for yeast breads.
Q: What can I do if my dough doesn’t rise?
A: Make sure your yeast is fresh and your water is at the right temperature (around 110°F). If the dough still doesn’t rise, consider placing it in a warm oven (turned off) to encourage rising.
Q: Can I add cheese to the dough?
A: Absolutely! Adding shredded cheese like mozzarella or cheddar to the dough can give your breadsticks a cheesy twist.
Conclusion
Garlic breadsticks are a delightful addition to any meal, offering a burst of flavor and a comforting texture that is hard to resist. With just a few simple ingredients and a bit of time, you can create these delicious breadsticks at home and impress your family and friends.
Whether you’re a seasoned baker or a beginner, following this guide will help you achieve perfect garlic breadsticks every time. So, roll up your sleeves, gather your ingredients, and enjoy the process of baking these mouthwatering treats. Once you experience the satisfaction of pulling a batch of homemade garlic breadsticks fresh from the oven, you’ll never want to buy store-bought again!
Print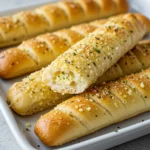
Garlic Breadsticks
Ingredients
To make garlic breadsticks, you’ll need a few simple ingredients, most of which you probably already have in your pantry. Here’s what you’ll need:
- Bread Flour: 3 cups
- Warm Water: 1 cup (around 110°F)
- Active Dry Yeast: 2 ¼ teaspoons
- Sugar: 1 tablespoon
- Salt: 1 teaspoon
- Olive Oil: 2 tablespoons
- Unsalted Butter: ¼ cup (melted)
- Garlic: 3-4 cloves (minced)
- Fresh Parsley: 2 tablespoons (finely chopped)
- Dried Oregano: 1 teaspoon
- Grated Parmesan Cheese: ¼ cup (optional)
Instructions
Creating garlic breadsticks at home is a rewarding process that involves a few key steps. Follow these instructions to achieve the perfect soft and flavorful breadsticks:
Preparing the Dough
- Activate the Yeast: In a small bowl, combine the warm water, sugar, and active dry yeast. Stir gently and let it sit for about 5-10 minutes until it becomes frothy.
- Mix the Dry Ingredients: In a large mixing bowl, combine the bread flour and salt.
- Combine Wet and Dry Ingredients: Make a well in the center of the flour mixture and pour in the yeast mixture and olive oil. Mix until a dough begins to form.
- Knead the Dough: Transfer the dough to a floured surface and knead for about 8-10 minutes until it is smooth and elastic. If the dough is too sticky, add a little more flour as needed.
- Let the Dough Rise: Place the kneaded dough in a lightly oiled bowl, cover it with a clean kitchen towel, and let it rise in a warm place for about 1-2 hours or until it has doubled in size.
Shaping and Baking the Breadsticks
- Preheat the Oven: Preheat your oven to 400°F (200°C) and line a baking sheet with parchment paper.
- Shape the Breadsticks: Once the dough has risen, punch it down to release the air. Divide it into 12 equal pieces. Roll each piece into a log shape, about 8-10 inches long, and place them on the prepared baking sheet.
- Brush with Garlic Butter: In a small bowl, mix the melted butter, minced garlic, chopped parsley, and dried oregano. Brush this mixture generously over each breadstick.
- Bake: Place the breadsticks in the preheated oven and bake for 15-20 minutes or until they are golden brown.
- Add Final Touches: If desired, sprinkle grated Parmesan cheese over the hot breadsticks as soon as they come out of the oven for an extra layer of flavor.
Nutrition
- Serving Size: one normal portion
- Calories: 150
- Fat: 6g
- Saturated Fat: 3g
- Cholesterol: 15mg