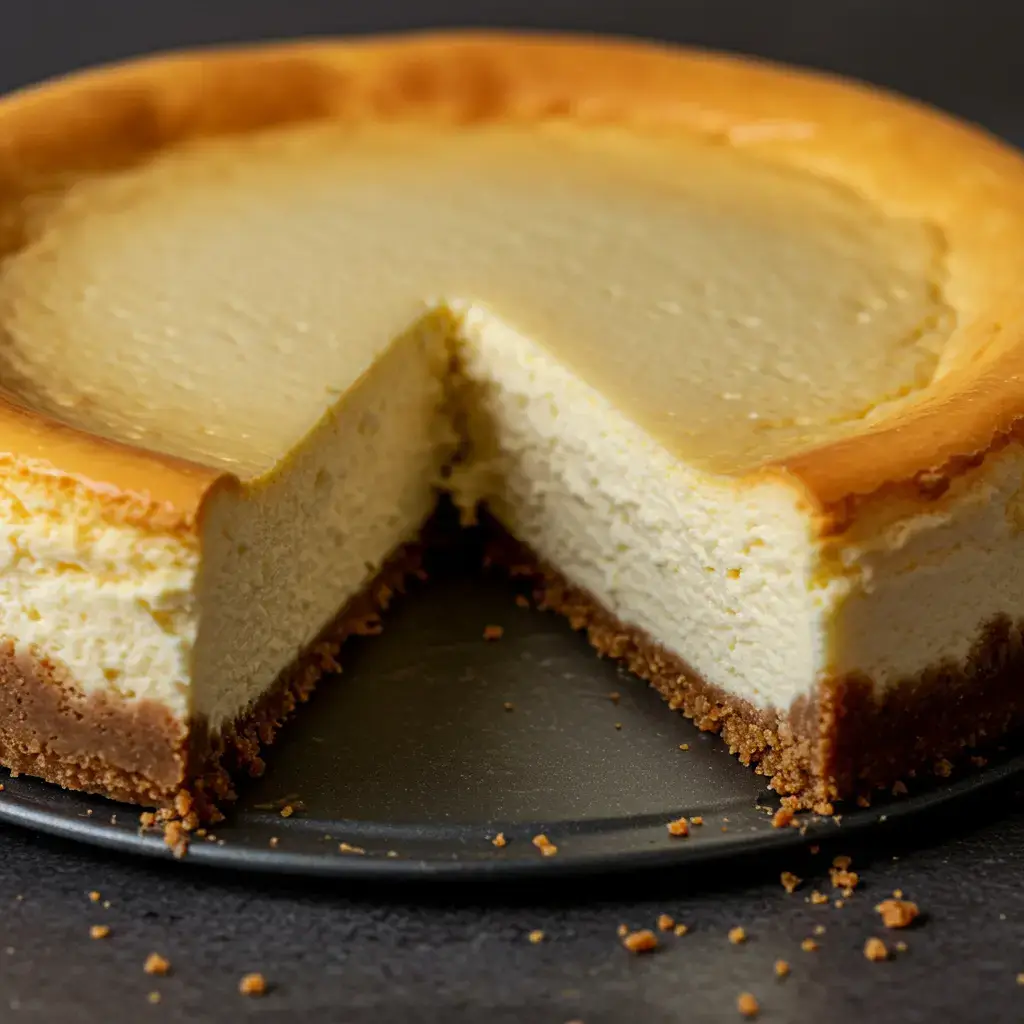

When it comes to iconic desserts, few can rival the status of the Classic New York Cheesecake. Rich, creamy, and delectably smooth, this dessert is a staple in American culinary history and a favorite among dessert enthusiasts worldwide. Originating from New York City in the early 20th century, the New York Cheesecake has evolved into a symbol of indulgence, embodying a perfect balance of flavors and textures that delight the palate. Whether served at a sophisticated dinner party or enjoyed as a sweet treat after a long day, this cheesecake is sure to impress with its unparalleled taste and elegant simplicity.
In this article, we will guide you through crafting the perfect Classic New York Cheesecake at home. From assembling the finest ingredients to mastering the art of baking, you’ll find everything you need to know to create this timeless dessert right in your own kitchen.
Ingredients
Crafting a Classic New York Cheesecake begins with gathering the right ingredients. Here’s what you’ll need:
For the Crust:
- 1 1/2 cups graham cracker crumbs
- 1/4 cup sugar
- 1/2 cup melted butter
For the Filling:
- 4 (8 oz) packages cream cheese, softened
- 1 cup sugar
- 1 tsp vanilla extract
- 4 large eggs
- 1 cup sour cream
- 1/4 cup all-purpose flour
- 1 tsp lemon juice
Instructions
Follow these step-by-step instructions to create your own Classic New York Cheesecake:
- Preheat the Oven:
- Preheat your oven to 350°F (175°C) to ensure it reaches the right temperature for baking.
- Prepare the Crust:
- In a medium-sized bowl, combine the graham cracker crumbs, 1/4 cup sugar, and melted butter.
- Mix until the ingredients are well combined and resemble wet sand.
- Press this mixture firmly into the bottom of a 9-inch springform pan, ensuring an even layer.
- Make the Filling:
- In a large mixing bowl, beat the softened cream cheese until smooth and creamy. Use an electric mixer for best results.
- Gradually add 1 cup sugar and vanilla extract to the cream cheese, continuing to mix until fully incorporated.
- Add the eggs one at a time, mixing well after each addition to maintain a smooth consistency.
- Blend in the sour cream, flour, and lemon juice, mixing until the filling is smooth and free of lumps.
- Assemble the Cheesecake:
- Pour the cheesecake filling over the prepared crust in the springform pan. Use a spatula to spread it evenly, ensuring a smooth top.
- Bake:
- Place the cheesecake in the preheated oven and bake for 50-60 minutes. The cheesecake is done when the center is set but still slightly jiggly.
- Cool and Chill:
- Remove the cheesecake from the oven and let it cool at room temperature.
- Once cooled, refrigerate the cheesecake for at least 4 hours, or preferably overnight, to allow it to set fully.
Nutrition Facts
Understanding the nutritional profile of your Classic New York Cheesecake can help you enjoy it mindfully. Here are the nutrition facts per slice, assuming the cheesecake serves 12:
- Calories: 350
- Protein: 6g
- Carbohydrates: 30g
- Fat: 24g
- Sugar: 15g
How to Serve
A Classic New York Cheesecake is a versatile dessert that can be served in various ways to suit different occasions, each method enhancing its rich and creamy texture while catering to diverse tastes and preferences. Here’s a comprehensive guide on how to serve your cheesecake, ensuring it becomes the star of any gathering:
1. Plain
Savoring the cheesecake in its purest form is a delightful experience that allows you to appreciate the skill and ingredients that went into making it. When served plain, the cheesecake showcases its velvety texture and subtle flavor profile. For the best experience, consider chilling the cheesecake for several hours or overnight to achieve optimal firmness and flavor development. Slice it into generous portions and serve on chilled plates to maintain its temperature. This minimalist approach not only highlights the cheesecake’s creamy consistency but also makes it a perfect base for those who appreciate the classic taste without distractions.
2. With Fresh Berries
Adding fresh berries to your cheesecake transforms it into a vibrant and visually appealing dessert that bursts with flavor. Consider a medley of seasonal berries like strawberries, blueberries, and raspberries, which not only enhance the aesthetic but also provide a delightful contrast to the richness of the cheesecake. To serve, gently toss the berries in a bit of sugar or a splash of lemon juice to enhance their natural sweetness. Arrange them artfully on top of the cheesecake or serve them on the side in a small bowl, allowing guests to customize their dessert experience. For an added touch, a sprinkle of mint leaves can introduce an aromatic freshness that perfectly complements the berries and cheesecake.
3. Drizzled with Sauce
Elevate your cheesecake by drizzling it with a sauce that adds an extra layer of flavor and indulgence. Popular choices include rich chocolate ganache, luscious caramel, or a homemade fruit coulis made from pureed berries or citrus. To create a visually striking presentation, use a squeeze bottle or a spoon to create artistic patterns on top of the cheesecake or around the plate. You can even allow guests to choose their preferred sauce, serving them in small bowls for a delightful DIY dessert experience. For a more decadent take, consider warming the sauces slightly before serving, allowing them to flow over the cheesecake in a delicious cascade.
4. Accompanied by Whipped Cream
Whipped cream is a classic pairing with cheesecake that adds a light and airy contrast to the dense and creamy texture of the dessert. To achieve the perfect whipped cream, use heavy cream and beat it with a touch of sugar and vanilla extract until soft peaks form. For an indulgent twist, consider adding flavored extracts, such as almond or orange, to the whipped cream for added depth. Serve the whipped cream on the side in a decorative bowl or dollop it generously on top of each slice of cheesecake. You can also pipe it onto the plate for an elegant presentation. For an extra flair, consider sprinkling chocolate shavings, crushed nuts, or a dusting of cocoa powder over the whipped cream.
Additional Serving Suggestions
- With Ice Cream: A slice of cheesecake alongside a scoop of vanilla, chocolate, or fruit-flavored ice cream creates a delightful combination of textures and temperatures.
- Garnished with Nuts: Chopped pecans or walnuts can add a crunchy element when sprinkled on top or served alongside the cheesecake, providing a delicious contrast to its creaminess.
- Layered Desserts: For a creative twist, consider layering cheesecake with other ingredients in a glass. Alternate layers of cheesecake, whipped cream, and fruit to create an eye-catching dessert parfait.
- Cheesecake Bars: For a more casual presentation, cut the cheesecake into bars instead of traditional slices. Serve them on a platter with assorted toppings, allowing guests to customize their bars with sauces, whipped cream, or fruits.
By exploring these various serving options, you can cater to different tastes and preferences, ensuring that your Classic New York Cheesecake is not only a delicious treat but also a memorable experience for all your guests. Whether you opt for a simple presentation or an elaborate display, this iconic dessert is sure to impress and satisfy.
Additional Tips
Achieving a perfect cheesecake requires attention to detail and a few key techniques that can elevate your dessert from good to extraordinary. Here’s an expanded guide on how to ensure your cheesecake turns out flawlessly every time:
1. Room Temperature Ingredients
One of the most crucial steps in cheesecake preparation is to ensure that all your ingredients are at room temperature before mixing. This step is essential for several reasons:
- Smooth Consistency: Cold ingredients can lead to a lumpy batter. When cream cheese, eggs, and sour cream (if used) are at room temperature, they combine more easily, resulting in a smoother filling.
- Even Mixing: Ingredients that are at different temperatures will not mix evenly. For instance, if your cream cheese is cold while the eggs are at room temperature, the cold cream cheese will not incorporate well, causing lumps.
- Better Emulsification: Room temperature ingredients emulsify better, creating a uniform batter that contributes to the final texture of the cheesecake.
To prepare, take your cream cheese, eggs, and any other refrigerated ingredients out of the fridge at least 30 minutes before you start mixing. If you’re pressed for time, you can cut the cream cheese into smaller pieces or microwave it gently for 10-15 seconds to soften it, but be careful not to melt it.
2. Avoid Overmixing
While it’s important to mix your cheesecake batter until smooth, it’s equally important to avoid overmixing. Overmixing can introduce excess air into the batter, which can cause the cheesecake to rise during baking and then sink or crack as it cools. Here’s how to strike the right balance:
- Mix Just Until Combined: Use a mixer on low speed or a spatula to mix the batter until the ingredients are just combined. You want to see no visible lumps but be careful not to whip air into the batter.
- Check for Lumps: If you notice any lumps of cream cheese that haven’t blended, you can press them against the side of the bowl with your spatula to break them up, rather than continuing to mix.
- Scrape the Bowl: Make sure to scrape the sides and bottom of the bowl frequently to ensure even mixing without overdoing it.
3. Use a Water Bath
Baking a cheesecake in a water bath (or bain-marie) is an excellent technique to promote even cooking and minimize the risk of cracking. Here’s how to do it effectively:
- Prepare the Pan: Wrap the outside of your springform pan with aluminum foil. This will prevent water from seeping into the pan and ruining your crust. Ensure the foil is wrapped tightly and without any holes.
- Set Up the Water Bath: Place the wrapped springform pan in a larger baking dish. Fill the outer pan with hot water until it reaches about halfway up the sides of the springform pan. This creates a humid environment in the oven, which helps the cheesecake cook evenly.
- Monitor Baking Time: Keep an eye on the cheesecake while it bakes. The water bath may slow down the cooking process slightly, so you may need to adjust your baking time accordingly. A properly baked cheesecake should still have a slight jiggle in the center when you take it out.
4. Run a Knife Around the Edge
After baking your cheesecake, it’s crucial to run a knife around the edges to prevent it from sticking to the sides of the pan during cooling. Here’s how to do it correctly:
- Use a Thin Knife or Spatula: A thin-bladed knife or an offset spatula works best for this task. Run it gently along the edges of the cheesecake while it’s still warm. This will create a small gap between the cheesecake and the pan, reducing the risk of cracks as it cools.
- Cool Gradually: Allow the cheesecake to cool in the pan for about an hour at room temperature before transferring it to the refrigerator. Rapid temperature changes can also lead to cracks, so it’s best to let it cool gradually.
- Chill Thoroughly: For the best texture and flavor, refrigerate your cheesecake for at least 4 hours, but ideally overnight. This allows the cheesecake to set properly and enhances the flavors.
By incorporating these additional tips into your cheesecake-making routine, you’ll increase your chances of creating a delectable dessert that is not only visually appealing but also rich, creamy, and utterly delicious. Happy baking!
FAQs
Q: Can I make the cheesecake ahead of time? A: Yes, the cheesecake can be made up to two days in advance. Store it in the refrigerator, and for the best taste, serve it within three days.
Q: How do I prevent my cheesecake from cracking? A: To prevent cracks, avoid overmixing the batter, use a water bath, and allow the cheesecake to cool gradually without sudden temperature changes.
Q: Can I freeze the cheesecake? A: Absolutely! Wrap the cheesecake tightly in plastic wrap and foil before freezing. It can be stored in the freezer for up to one month. Thaw in the refrigerator before serving.
Q: What can I substitute for graham cracker crumbs? A: If you’re out of graham crackers, you can use crushed digestive biscuits, vanilla wafers, or even crushed cookies for a unique twist.
Conclusion
Creating a Classic New York Cheesecake at home is a rewarding experience that results in a dessert beloved by many. With its rich, creamy filling and buttery crust, this cheesecake is sure to impress both family and friends. By following the detailed instructions and tips provided, you can master the art of cheesecake-making and enjoy the timeless elegance of this iconic dessert. Whether you’re a seasoned baker or a kitchen novice, the Classic New York Cheesecake is a delightful addition to any culinary repertoire. So, gather your ingredients, preheat your oven, and embark on a journey to create a dessert masterpiece that will leave everyone asking for seconds.
Print
Classic New York Cheesecake
Ingredients
Crafting a Classic New York Cheesecake begins with gathering the right ingredients. Here’s what you’ll need:
For the Crust:
- 1 1/2 cups graham cracker crumbs
- 1/4 cup sugar
- 1/2 cup melted butter
For the Filling:
- 4 (8 oz) packages cream cheese, softened
- 1 cup sugar
- 1 tsp vanilla extract
- 4 large eggs
- 1 cup sour cream
- 1/4 cup all-purpose flour
- 1 tsp lemon juice
Instructions
Follow these step-by-step instructions to create your own Classic New York Cheesecake:
- Preheat the Oven:
- Preheat your oven to 350°F (175°C) to ensure it reaches the right temperature for baking.
- Prepare the Crust:
- In a medium-sized bowl, combine the graham cracker crumbs, 1/4 cup sugar, and melted butter.
- Mix until the ingredients are well combined and resemble wet sand.
- Press this mixture firmly into the bottom of a 9-inch springform pan, ensuring an even layer.
- Make the Filling:
- In a large mixing bowl, beat the softened cream cheese until smooth and creamy. Use an electric mixer for best results.
- Gradually add 1 cup sugar and vanilla extract to the cream cheese, continuing to mix until fully incorporated.
- Add the eggs one at a time, mixing well after each addition to maintain a smooth consistency.
- Blend in the sour cream, flour, and lemon juice, mixing until the filling is smooth and free of lumps.
- Assemble the Cheesecake:
- Pour the cheesecake filling over the prepared crust in the springform pan. Use a spatula to spread it evenly, ensuring a smooth top.
- Bake:
- Place the cheesecake in the preheated oven and bake for 50-60 minutes. The cheesecake is done when the center is set but still slightly jiggly.
- Cool and Chill:
- Remove the cheesecake from the oven and let it cool at room temperature.
- Once cooled, refrigerate the cheesecake for at least 4 hours, or preferably overnight, to allow it to set fully.
Nutrition
- Serving Size: one normal portion
- Calories: 350
- Sugar: 15g
- Fat: 24g
- Carbohydrates: 30g
- Protein: 6g