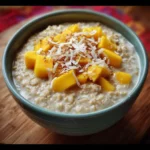
The search for the perfect breakfast can feel like a never-ending quest. For years, my mornings were a chaotic scramble of trying to find something that was quick, healthy, and, most importantly, something my entire family would actually eat without complaint. We cycled through toast, cereal, and smoothies, but nothing ever truly stuck. I needed a breakfast hero—a recipe that could be prepped ahead of time, was packed with wholesome ingredients, and delivered on flavor. That’s when I discovered the magic of these Berry Oat Breakfast Cups. The first time I baked a batch, the house filled with the warm, comforting aroma of cinnamon, vanilla, and sweet berries. It was intoxicating. When my kids, usually suspicious of anything overtly “healthy,” saw them cooling on the counter, they were immediately intrigued. They looked like cupcakes, but I knew they were packed with the goodness of oats, fruit, and chia seeds. The verdict? An overwhelming success. They loved the soft, chewy texture and the juicy burst of berries in every bite. For me, it was a game-changer. I finally had a grab-and-go breakfast that I felt good about serving and that they were excited to eat. These little cups have become our morning staple, saving us from the daily breakfast dilemma and starting our day on a delicious and nutritious note.
Ingredients
- 2 cups Rolled Oats (Old-Fashioned Oats): These form the hearty base of our breakfast cups. Using rolled oats provides a wonderfully chewy and satisfying texture that holds up perfectly after baking, unlike quick oats which can become mushy. For a gluten-free version, be sure to use certified gluten-free rolled oats.
- 2 large, very Ripe Bananas: The riper, the better! Brown-spotted bananas are your best friend here. They act as a natural sweetener, reducing the need for added sugar, and also serve as a crucial binder that helps hold the cups together.
- 1 ½ cups Mixed Berries (Fresh or Frozen): This is where the vibrant flavor and color come from. A mix of strawberries, blueberries, raspberries, and blackberries offers a fantastic range of sweet and tart notes. Both fresh and frozen berries work beautifully; if using frozen, there’s no need to thaw them first.
- 1 cup Unsweetened Almond Milk: This provides the necessary moisture to soften the oats and bring the batter together. You can easily substitute this with any other dairy or non-dairy milk you prefer, such as oat milk, soy milk, coconut milk, or regular cow’s milk.
- ¼ cup Maple Syrup: For a touch of clean, unrefined sweetness that complements the fruit and oats perfectly. Pure maple syrup is recommended for the best flavor. You can also use honey (if not vegan) or agave nectar as a substitute.
- 2 tablespoons Chia Seeds: These tiny seeds are a nutritional powerhouse and work as a secondary binder. When mixed with liquid, they form a gel-like consistency that helps firm up the cups and adds a boost of fiber and omega-3 fatty acids.
- 1 teaspoon Vanilla Extract: A small amount of pure vanilla extract enhances all the other flavors in the recipe, adding a layer of warmth and depth that makes these cups taste like a true treat.
- 1 teaspoon Ground Cinnamon: This warm spice is a classic pairing with oats and fruit. It adds a comforting aroma and a subtle spicy note that elevates the overall flavor profile.
- 1 ½ teaspoons Baking Powder: This is the leavening agent that gives the breakfast cups a little bit of lift, preventing them from becoming too dense and creating a lighter, more pleasant texture.
- ¼ teaspoon Salt: A pinch of salt is essential in any sweet recipe. It doesn’t make the cups salty; instead, it sharpens and brightens all the other flavors, making the sweetness of the fruit and maple syrup pop.
Instructions
- Preheat and Prepare: Begin by preheating your oven to 375°F (190°C). Prepare a standard 12-cup muffin tin by either greasing it thoroughly with oil or coconut oil, or by lining it with paper or silicone muffin liners. Silicone liners are highly recommended as they prevent any possibility of sticking.
- Mash the Bananas: In a large mixing bowl, place the two ripe bananas. Using a fork or a potato masher, mash them until they are mostly smooth. A few small lumps are perfectly fine and will add to the texture, but you want to break them down enough to be easily incorporated as a liquid base.
- Combine Wet Ingredients: To the bowl with the mashed bananas, add the almond milk, maple syrup, and vanilla extract. Whisk these wet ingredients together until they are fully combined and the mixture is smooth and consistent.
- Incorporate Dry Ingredients: Add the rolled oats, chia seeds, ground cinnamon, baking powder, and salt to the wet mixture in the bowl. Use a spatula or a large spoon to stir everything together. Continue mixing until all the oats are moistened and the ingredients are evenly distributed. Do not overmix; just stir until everything is combined.
- Fold in the Berries: Gently fold in the mixed berries using your spatula. Be gentle during this step to avoid crushing the berries too much, especially if you are using fresh, delicate ones like raspberries. You want them to remain whole so they burst with juice during baking.
- Let the Mixture Rest: Allow the oatmeal mixture to sit in the bowl for about 5-10 minutes. This important step gives the chia seeds and oats time to absorb some of the liquid, which will help the cups bind together and result in a better final texture.
- Portion into Muffin Tin: Using an ice cream scoop or a large spoon, divide the oatmeal mixture evenly among the 12 prepared muffin cups. An ice cream scoop is a great tool for this, as it ensures each cup is roughly the same size, promoting even baking. Fill each cup almost to the top.
- Bake to Perfection: Place the muffin tin in the preheated oven. Bake for 25-30 minutes. You’ll know they’re done when the tops are lightly golden brown, the edges are firm, and a toothpick inserted into the center of a cup comes out clean (you might hit a juicy berry, so test in a couple of spots).
- Cool Completely: This is a crucial step! Once removed from the oven, let the Berry Oat Breakfast Cups cool in the muffin tin for at least 15-20 minutes. This allows them to set and firm up. After the initial cooling, carefully transfer them to a wire rack to cool completely to room temperature. If you try to remove them while they are too warm, they may crumble.
Nutrition Facts
- Servings: 12 Breakfast Cups
- Calories: Approximately 130-150 kcal per cup. This makes for a light yet satisfying breakfast or snack that fuels your morning without feeling heavy.
- Fiber (Approx. 4g per cup): With a significant portion of the daily recommended intake, the fiber from the oats, berries, and chia seeds promotes healthy digestion and helps keep you feeling full and satisfied for hours.
- Protein (Approx. 4g per cup): A decent amount of plant-based protein from the oats and chia seeds helps in maintaining energy levels and supporting muscle health, making these cups a great post-workout snack as well.
- Potassium (Approx. 200mg per cup): The bananas provide a healthy dose of potassium, an essential mineral and electrolyte that is vital for heart health, blood pressure regulation, and proper muscle function.
- Antioxidants: The mixed berries are packed with powerful antioxidants like anthocyanins, which help combat oxidative stress in the body and support overall cellular health.
Disclaimer: The nutritional information provided is an estimate and can vary based on the specific ingredients and brands used.
Preparation Time
These Berry Oat Breakfast Cups are designed for convenience, with a total time that fits easily into any schedule. The active preparation time is only about 10-15 minutes, which involves gathering your ingredients, mashing the bananas, and mixing everything together. The baking time is 25-30 minutes, a hands-off period where your oven does all the work. Finally, the crucial cooling time takes about 30 minutes for the cups to set properly. In total, you can have a week’s worth of healthy breakfasts ready in just about an hour.
How to Serve
These versatile breakfast cups can be enjoyed in a multitude of ways, catering to different preferences and occasions. Here are some of our favorite ways to serve them:
- The Grab-and-Go:
- Enjoy them straight from the fridge for a quick, chilled, and refreshing breakfast on busy mornings. They are perfectly portable and mess-free.
- Warm and Cozy:
- Gently reheat a cup in the microwave for 20-30 seconds. This softens the cup and makes the berries extra juicy, creating a comforting, warm breakfast reminiscent of a fresh bowl of baked oatmeal.
- The Yogurt Parfait Bowl:
- Crumble one or two breakfast cups into a bowl.
- Top with a generous dollop of Greek yogurt, coconut yogurt, or your favorite plant-based alternative.
- Add a handful of fresh berries and a sprinkle of granola or chopped nuts for extra crunch.
- The “Drizzled” Delight:
- Place a cup on a plate and warm it slightly.
- Drizzle it with a spoonful of almond butter, peanut butter, or a seed butter like tahini.
- For extra decadence, add a light drizzle of maple syrup or honey.
- As a Healthy Dessert:
- Serve a warmed oat cup alongside a scoop of vanilla bean ice cream or a frozen banana “nice” cream for a wholesome and satisfying dessert.
Additional Tips
- The Oat Choice is Key: For the best texture, stick with old-fashioned rolled oats. Instant or quick oats are processed differently and will absorb the liquid too quickly, resulting in a mushier, less structured cup. Steel-cut oats will not work as they require a much longer cooking time and more liquid.
- Customize Your Mix-Ins: Don’t be afraid to get creative! You can easily customize these cups to your liking. Try adding a ¼ cup of chopped walnuts or pecans for crunch, a tablespoon of hemp seeds for extra protein, or a ¼ cup of dark chocolate chips for a more indulgent treat. Shredded coconut is another fantastic addition.
- Embrace the Ripeness: The ripeness of your bananas is critical. Overripe bananas with plenty of brown spots are significantly sweeter and softer, meaning you get maximum natural sweetness and they are much easier to mash into a smooth puree, which is essential for the recipe’s structure.
- Managing Berry Moisture: If using frozen berries, do not thaw them beforehand. Add them to the batter while still frozen. Be aware that frozen berries can release more moisture during baking, so you may need to add an extra 2-3 minutes to the baking time to ensure the cups are fully cooked through.
- The Muffin Liner Debate: While greasing the pan works, silicone muffin liners are the superior choice for this recipe. They are reusable, eco-friendly, and guarantee that the oat cups will pop out effortlessly without any sticking or crumbling. Paper liners can sometimes stick if not of high quality.
- Use an Ice Cream Scoop for Uniformity: For perfectly portioned, uniform cups that bake evenly, use a standard-sized ice cream scoop with a trigger release. This simple trick makes the process faster, less messy, and ensures that every single cup is the same size.
- Achieve the Perfect Texture by Not Overmixing: Once you add the dry ingredients to the wet, stir only until they are just combined. Overmixing the batter can develop the gluten in any trace flour on the oats and can lead to tougher, denser breakfast cups. A gentle hand is best.
- Patience During Cooling is a Virtue: This might be the most important tip. You must let the oat cups cool completely before attempting to remove them from the tin (unless using silicone liners). As they cool, the starches, oats, and chia seeds will finish setting, which is what gives them their firm, portable structure. Trying to move them while warm will likely result in a crumbly mess.
FAQ Section
1. Can I make these Berry Oat Breakfast Cups gluten-free?
Absolutely! The recipe is naturally close to being gluten-free. The only ingredient you need to be mindful of is the oats. To ensure the recipe is 100% gluten-free, simply purchase certified gluten-free rolled oats. These are processed in facilities that prevent cross-contamination with wheat.
2. How should I store these breakfast cups, and how long do they last?
Once the cups have cooled completely to room temperature, store them in an airtight container in the refrigerator. They will stay fresh and delicious for up to 5 days, making them perfect for weekly meal prep.
3. Can I freeze the Berry Oat Breakfast Cups for later?
Yes, they freeze exceptionally well! To freeze, first let them cool completely. Then, you can either wrap each cup individually in plastic wrap or place them on a baking sheet in the freezer for an hour until solid (this is called flash freezing). Once solid, transfer the individual cups to a freezer-safe zip-top bag or container. They can be stored in the freezer for up to 3 months. To enjoy, you can thaw them overnight in the refrigerator or microwave one from frozen for about 45-60 seconds.
4. Can I use a different sweetener instead of maple syrup?
Of course. You can substitute the maple syrup with an equal amount of honey (if you are not following a vegan diet) or agave nectar. For a completely sugar-free option, you could use a sugar-free maple-flavored syrup or even increase the amount of mashed banana slightly for more natural sweetness.
5. My oat cups turned out crumbly. What might have gone wrong?
There are a few common reasons for crumbly oat cups. First, they may have been under-baked, not allowing the binders to fully set. Second, you might have tried to remove them from the muffin tin while they were still too warm. They need to cool completely to firm up. Finally, ensure your bananas were large and ripe enough, as they are a primary binding agent.
6. Can I use other fruits instead of mixed berries?
Yes, this recipe is very adaptable. You can substitute the berries with other fruits. Some great options include finely diced apples with a pinch of nutmeg, chopped peaches, or small chunks of mango. If using a particularly juicy fruit like peaches, you might need to add a couple of extra minutes to the baking time to account for the added moisture.
7. Is it possible to add protein powder to this recipe for an extra boost?
Yes, you can enhance the protein content by adding protein powder. I recommend adding 1-2 scoops of your favorite vanilla or unflavored protein powder along with the other dry ingredients. To compensate for the added dry ingredient, you may need to add a few extra tablespoons of almond milk to ensure the batter isn’t too thick.
8. Are these breakfast cups suitable for toddlers and kids?
These are an ideal breakfast for toddlers and kids! They are soft and easy to chew, naturally sweetened with fruit, and free from refined sugars. The cupcake-like appearance makes them appealing to children, and they are a fantastic way to pack in fiber and nutrients to start their day. You can even use a mini muffin tin to make smaller, bite-sized portions perfect for little hands.