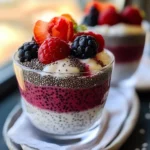
It started, as many kitchen experiments do, with a need for something easy, healthy, and genuinely delicious that wouldn’t require hours of effort. My mornings are often a whirlwind, and finding a breakfast that satisfies everyone (including picky eaters!) while also being nutritious felt like searching for a unicorn. Then came the revelation of chia pudding. Initially skeptical about the texture, I was determined to crack the code. After a few tries, tweaking ratios and flavours, these Berry Chia Pudding Cups were born, and they became an instant sensation in our household. The vibrant swirls of berry puree mingling with the creamy, subtly sweet chia pudding, all prepped the night before and waiting in convenient little cups in the fridge? It felt like a breakfast miracle. Even my kids, who usually eye anything remotely “healthy” with suspicion, devour these, loving the “sprinkles” (chia seeds) and the fruity burst. It’s become our go-to for busy weekday mornings, a refreshing afternoon snack, and even a light, guilt-free dessert. The beauty lies in its simplicity, its versatility, and the undeniable nutritional punch it packs. It’s more than just a recipe; it’s become a delightful little ritual that makes healthy eating feel effortless and enjoyable. If you’re searching for that perfect make-ahead, crowd-pleasing, nutrient-dense treat, look no further. These Berry Chia Pudding Cups might just become a staple in your home, too.
Ingredients for Berry Chia Pudding Cups
Here’s what you’ll need to create these delightful and healthy pudding cups:
- Chia Seeds (1/2 cup): These tiny powerhouses are the star, creating the signature pudding-like gel. Use whole black or white chia seeds.
- Milk (2 cups): The liquid base for the pudding. You can use dairy milk (whole, 2%, skim) or plant-based alternatives like unsweetened almond, soy, oat, or coconut milk (the canned variety will make it richer).
- Mixed Berries (1.5 cups, fresh or frozen): Provide vibrant colour, natural sweetness, and a boost of antioxidants. A mix of strawberries, blueberries, raspberries, and blackberries works beautifully.
- Sweetener (2-4 tablespoons, optional): Adjust to your preference. Maple syrup, honey (if not vegan), agave nectar, or even a few drops of liquid stevia work well. You can also omit it if the berries are sweet enough.
- Vanilla Extract (1 teaspoon): Enhances the overall flavour profile, adding warmth and depth.
- Optional Pinch of Salt (less than 1/8 teaspoon): Helps to balance and enhance the sweetness and other flavours.
Step-by-Step Instructions
Follow these simple steps to assemble your Berry Chia Pudding Cups:
- Combine Pudding Base: In a medium-sized bowl or a large jar, combine the chia seeds, milk, 1-2 tablespoons of your chosen sweetener (if using), vanilla extract, and the optional pinch of salt.
- First Whisk: Whisk the ingredients together thoroughly. Ensure there are no clumps of chia seeds sticking to the bottom or sides. Let it sit for 5-10 minutes.
- Second Whisk: After 5-10 minutes, give the mixture another vigorous whisk. This step is crucial for preventing clumps and ensuring a smooth, even gel forms as the chia seeds absorb the liquid.
- Chill: Cover the bowl or jar tightly with plastic wrap or a lid. Place it in the refrigerator to chill for at least 4 hours, or preferably overnight. This allows the chia seeds to fully hydrate and thicken into a pudding consistency.
- Prepare Berry Puree: While the chia pudding is chilling (or just before serving), prepare the berry component. Place the mixed berries and the remaining 1-2 tablespoons of sweetener (if desired) into a blender or food processor.
- Blend Berries: Blend the berries until smooth. If you prefer a slightly chunkier texture, pulse a few times instead of blending completely. If using frozen berries, you might need to let them thaw slightly or add a tablespoon of water or milk to help them blend. Taste and add more sweetener if needed.
- Check Pudding Consistency: Once chilled, check the chia pudding. It should be thick and scoopable, similar to tapioca pudding. If it’s too thin, stir in another tablespoon of chia seeds and let it chill for another hour or two. If it’s too thick, stir in a little more milk until you reach your desired consistency.
- Assemble the Cups: Gather your serving glasses, jars, or small bowls. You can assemble the cups in a few ways:
- Layered: Spoon a layer of chia pudding into the bottom of each cup, followed by a layer of berry puree. Repeat the layers until the cups are full, ending with berry puree or a dollop of pudding.
- Swirled: Fill the cups mostly with chia pudding, then top with a generous spoonful of berry puree. Use a spoon or knife to gently swirl the puree into the pudding for a marbled effect.
- Mixed: Gently fold most of the berry puree directly into the chilled chia pudding bowl until just combined (be careful not to overmix if you want distinct colours), then portion into cups. Reserve a little puree for topping.
- Garnish (Optional): Top your Berry Chia Pudding Cups with fresh berries, a sprinkle of granola, chopped nuts, seeds, or coconut flakes just before serving.
- Serve or Store: Serve immediately, or cover the individual cups and store them in the refrigerator for later.
Nutritional Highlights (Approximate)
This recipe makes approximately 4 servings. Nutritional values are estimates and can vary based on specific ingredients used (especially milk type and sweetener).
- Serving Size: 1 cup (approx. 1/4 of the recipe)
- Calories: Around 250-350 kcal per serving (highly dependent on milk and sweetener choices)
- Fiber (approx. 10-15g): Excellent source! Chia seeds are packed with fiber, promoting digestive health, helping you feel full and satisfied, and supporting stable blood sugar levels.
- Plant-Based Protein (approx. 5-10g): Contributes to satiety and muscle maintenance. The amount varies depending on the milk used (soy milk generally offers more protein than almond milk).
- Omega-3 Fatty Acids (ALA) (approx. 4-5g): Chia seeds are one of the best plant sources of Alpha-Linolenic Acid (ALA), an essential omega-3 fatty acid known for its heart-health benefits and anti-inflammatory properties.
- Antioxidants: Berries are rich in antioxidants like anthocyanins (giving them their vibrant colours), which help fight oxidative stress and inflammation in the body. Vitamin C is also present.
Preparation Time
- Active Preparation Time: 10-15 minutes (whisking the pudding base, blending the berries)
- Chilling Time: Minimum 4 hours, preferably overnight (8+ hours)
- Total Time: Approximately 4 hours 15 minutes to 8 hours 15 minutes+ (mostly hands-off chilling time)
Delicious Ways to Serve Your Berry Chia Pudding Cups
These cups are fantastic on their own, but adding toppings and varying the presentation can elevate them further! Here are some ideas:
- Classic Breakfast Bowl:
- Serve in a small bowl.
- Top generously with extra fresh berries (sliced strawberries, whole blueberries/raspberries).
- Add a sprinkle of crunchy granola or toasted oats.
- Include a handful of chopped nuts (almonds, walnuts, pecans) or seeds (pumpkin, sunflower).
- Parfait Style:
- Layer the chia pudding and berry puree in clear glasses or jars as described in the instructions.
- Add thin layers of plain yogurt (dairy or coconut) for extra creaminess and tang.
- Alternate layers with crushed biscuits or granola for texture contrast.
- Finish with a dollop of whipped cream (or coconut cream) and a mint sprig for an elegant look.
- Dessert Delight:
- Drizzle with a little melted dark chocolate or chocolate syrup.
- Top with chocolate shavings or mini chocolate chips.
- Add a spoonful of nut butter (almond, peanut, cashew) swirled on top or layered within.
- Sprinkle with toasted shredded coconut.
- Tropical Twist:
- Use mango or pineapple puree instead of or in addition to berries.
- Top with diced mango, pineapple chunks, and toasted coconut flakes.
- Consider using coconut milk (full-fat, canned) for an extra rich and tropical pudding base.
- On-the-Go Snack:
- Prepare directly in small jars with tight-fitting lids.
- Keep toppings separate (in a small container or bag) until ready to eat to maintain crunchiness. Perfect for meal prepping snacks for the week.
- Warm & Cozy (Optional):
- While typically served cold, you can gently warm the chia pudding over low heat before layering or serving (note: this may slightly change the texture). Serve immediately if warming.
Top Tips for Perfect Berry Chia Pudding Cups
Achieve chia pudding perfection every time with these helpful tips:
- The Double Whisk is Key: Don’t skip the second whisking 5-10 minutes after the initial mix. Chia seeds tend to clump together at the bottom initially. Whisking again breaks up these clumps and ensures every seed gets hydrated evenly, leading to a smooth, homogenous pudding without lumps.
- Adjust Consistency Like a Pro: Chia pudding thickness is personal preference. If after chilling it’s too thick, simply stir in more milk, a tablespoon at a time, until it reaches your desired consistency. If it’s too thin, add another teaspoon or tablespoon of chia seeds, whisk well, and chill for another hour or two. Remember, it thickens considerably as it sits.
- Sweeten Smartly: Taste your berry puree before adding sweetener – ripe berries can be naturally very sweet! Add sweetener gradually to both the pudding base and the puree, tasting as you go. You can always add more, but you can’t take it out. Consider date paste or mashing a ripe banana into the base for natural sweetness.
- Milk Matters: The type of milk you use affects both flavour and consistency. Full-fat dairy or canned coconut milk yields a richer, creamier pudding. Almond or skim milk results in a lighter version. Oat milk adds a subtle natural sweetness. Experiment to find your favourite! Ensure plant-based milks are unsweetened if you want control over the final sweetness level.
- Fresh vs. Frozen Berries: Both work perfectly! Frozen berries are often more economical and readily available year-round. They break down easily into a smooth puree, sometimes releasing more liquid (which can be good if your pudding is very thick). Fresh berries offer peak flavour when in season and might create a slightly brighter, fresher-tasting puree. Thaw frozen berries slightly before blending for easier processing.
- Boost the Flavour: Don’t stop at vanilla! Add a pinch of cinnamon, cardamom, or nutmeg to the chia base for warmth. A little citrus zest (lemon or orange) added to the berry puree can brighten the flavours significantly. A tiny drop of almond extract can also add a nice complementary note.
- Embrace Meal Prep: This recipe is ideal for making ahead. Prepare a larger batch and portion it into individual jars or containers. The basic chia pudding (without the berry puree mixed in) lasts well for up to 5 days in the fridge. Prepare the berry puree separately and store it in an airtight container, then assemble the cups just before serving or the night before for optimal freshness and texture.
- Blend Berries Smooth (or Not): For the smoothest puree, especially if using berries with noticeable seeds like raspberries or blackberries, blend thoroughly. If you don’t mind the seeds or prefer more texture, a quick pulse is sufficient. For an ultra-smooth, seedless puree, you can strain it through a fine-mesh sieve after blending, though this adds an extra step.
Frequently Asked Questions (FAQ)
Here are answers to some common questions about making Berry Chia Pudding Cups:
- Q: What exactly are chia seeds and why are they considered healthy?
- A: Chia seeds are tiny edible seeds from the Salvia hispanica plant, native to Central America. They are considered a superfood because they are incredibly nutrient-dense. They are packed with dietary fiber (great for digestion and satiety), plant-based protein, essential omega-3 fatty acids (ALA), antioxidants, and various micronutrients like calcium, magnesium, and phosphorus. When soaked in liquid, they form a unique gel-like substance, making them perfect for puddings.
- Q: Can I make this recipe vegan and dairy-free?
- A: Absolutely! This recipe is very easily made vegan and dairy-free. Simply choose a plant-based milk such as almond, soy, oat, cashew, or coconut milk instead of dairy milk. Also, ensure you use a vegan sweetener like maple syrup, agave nectar, or date syrup instead of honey.
- Q: How long does Berry Chia Pudding last in the refrigerator?
- A: Properly stored in an airtight container or covered tightly, the basic chia pudding (without berries mixed in or layered) can last for up to 5 days in the refrigerator. If you’ve already assembled the cups with the berry puree, they are best consumed within 2-3 days, as the berries might start to weep or lose some freshness.
- Q: Can I use different fruits instead of mixed berries?
- A: Yes, definitely! This recipe is highly adaptable. You can substitute the mixed berries with other fruits like mango puree, peach puree, mashed banana, unsweetened applesauce, or even tart cherry puree. Adjust the sweetener based on the natural sweetness of the fruit you choose. Layering with different fruit purees can create fun variations.
- Q: My chia pudding turned out lumpy. How can I fix it or prevent it next time?
- A: Lumps usually happen when the chia seeds clump together before they start gelling. The best prevention is the “double whisk” method mentioned in the tips: whisk thoroughly initially, let it sit for 5-10 minutes, then whisk vigorously again. If you already have lumps, you can try breaking them up with a fork or whisk. For a very lumpy batch, you could briefly blend a portion (or all) of the pudding with an immersion blender or regular blender, but be cautious as this can alter the texture slightly.
- Q: Can I use ground chia seeds instead of whole ones?
- A: You can, but it will result in a different texture and potentially a slightly different gelling time. Ground chia seeds absorb liquid faster and tend to create a smoother, more homogenous pudding, lacking the distinct “tapioca-like” pearls of whole seeds. Some people prefer this smoother texture. You might need slightly less ground chia than whole seeds, or the same amount for a very thick pudding. Experiment with a small batch first.
- Q: Is Berry Chia Pudding good for weight loss or weight management?
- A: Berry Chia Pudding can be a helpful part of a weight management plan. The high fiber content promotes feelings of fullness and satisfaction, which can help control appetite and reduce overall calorie intake. The protein also contributes to satiety. However, portion size and added sweeteners are crucial. Opt for unsweetened versions or use minimal natural sweeteners, choose lower-calorie milks, and be mindful of high-calorie toppings if weight loss is your goal.
- Q: Can I eat chia pudding warm?
- A: While chia pudding is typically served chilled, you can gently warm it if you prefer. Heat it slowly over low heat on the stovetop, stirring occasionally, until just warmed through. Be aware that heating can sometimes make the pudding slightly thinner or alter the gel structure. It’s not the traditional way to eat it, but it’s perfectly safe and might be enjoyable, especially on a cold morning. Avoid boiling it.
Berry Chia Pudding Cups
Ingredients
Here’s what you’ll need to create these delightful and healthy pudding cups:
- Chia Seeds (1/2 cup): These tiny powerhouses are the star, creating the signature pudding-like gel. Use whole black or white chia seeds.
- Milk (2 cups): The liquid base for the pudding. You can use dairy milk (whole, 2%, skim) or plant-based alternatives like unsweetened almond, soy, oat, or coconut milk (the canned variety will make it richer).
- Mixed Berries (1.5 cups, fresh or frozen): Provide vibrant colour, natural sweetness, and a boost of antioxidants. A mix of strawberries, blueberries, raspberries, and blackberries works beautifully.
- Sweetener (2-4 tablespoons, optional): Adjust to your preference. Maple syrup, honey (if not vegan), agave nectar, or even a few drops of liquid stevia work well. You can also omit it if the berries are sweet enough.
- Vanilla Extract (1 teaspoon): Enhances the overall flavour profile, adding warmth and depth.
- Optional Pinch of Salt (less than 1/8 teaspoon): Helps to balance and enhance the sweetness and other flavours.
Instructions
Follow these simple steps to assemble your Berry Chia Pudding Cups:
- Combine Pudding Base: In a medium-sized bowl or a large jar, combine the chia seeds, milk, 1-2 tablespoons of your chosen sweetener (if using), vanilla extract, and the optional pinch of salt.
- First Whisk: Whisk the ingredients together thoroughly. Ensure there are no clumps of chia seeds sticking to the bottom or sides. Let it sit for 5-10 minutes.
- Second Whisk: After 5-10 minutes, give the mixture another vigorous whisk. This step is crucial for preventing clumps and ensuring a smooth, even gel forms as the chia seeds absorb the liquid.
- Chill: Cover the bowl or jar tightly with plastic wrap or a lid. Place it in the refrigerator to chill for at least 4 hours, or preferably overnight. This allows the chia seeds to fully hydrate and thicken into a pudding consistency.
- Prepare Berry Puree: While the chia pudding is chilling (or just before serving), prepare the berry component. Place the mixed berries and the remaining 1-2 tablespoons of sweetener (if desired) into a blender or food processor.
- Blend Berries: Blend the berries until smooth. If you prefer a slightly chunkier texture, pulse a few times instead of blending completely. If using frozen berries, you might need to let them thaw slightly or add a tablespoon of water or milk to help them blend. Taste and add more sweetener if needed.
- Check Pudding Consistency: Once chilled, check the chia pudding. It should be thick and scoopable, similar to tapioca pudding. If it’s too thin, stir in another tablespoon of chia seeds and let it chill for another hour or two. If it’s too thick, stir in a little more milk until you reach your desired consistency.
- Assemble the Cups: Gather your serving glasses, jars, or small bowls. You can assemble the cups in a few ways:
- Layered: Spoon a layer of chia pudding into the bottom of each cup, followed by a layer of berry puree. Repeat the layers until the cups are full, ending with berry puree or a dollop of pudding.
- Swirled: Fill the cups mostly with chia pudding, then top with a generous spoonful of berry puree. Use a spoon or knife to gently swirl the puree into the pudding for a marbled effect.
- Mixed: Gently fold most of the berry puree directly into the chilled chia pudding bowl until just combined (be careful not to overmix if you want distinct colours), then portion into cups. Reserve a little puree for topping.
- Garnish (Optional): Top your Berry Chia Pudding Cups with fresh berries, a sprinkle of granola, chopped nuts, seeds, or coconut flakes just before serving.
- Serve or Store: Serve immediately, or cover the individual cups and store them in the refrigerator for later.
Nutrition
- Serving Size: one normal portion
- Calories: 350
- Fat: 5g
- Fiber: 15g
- Protein: 10g