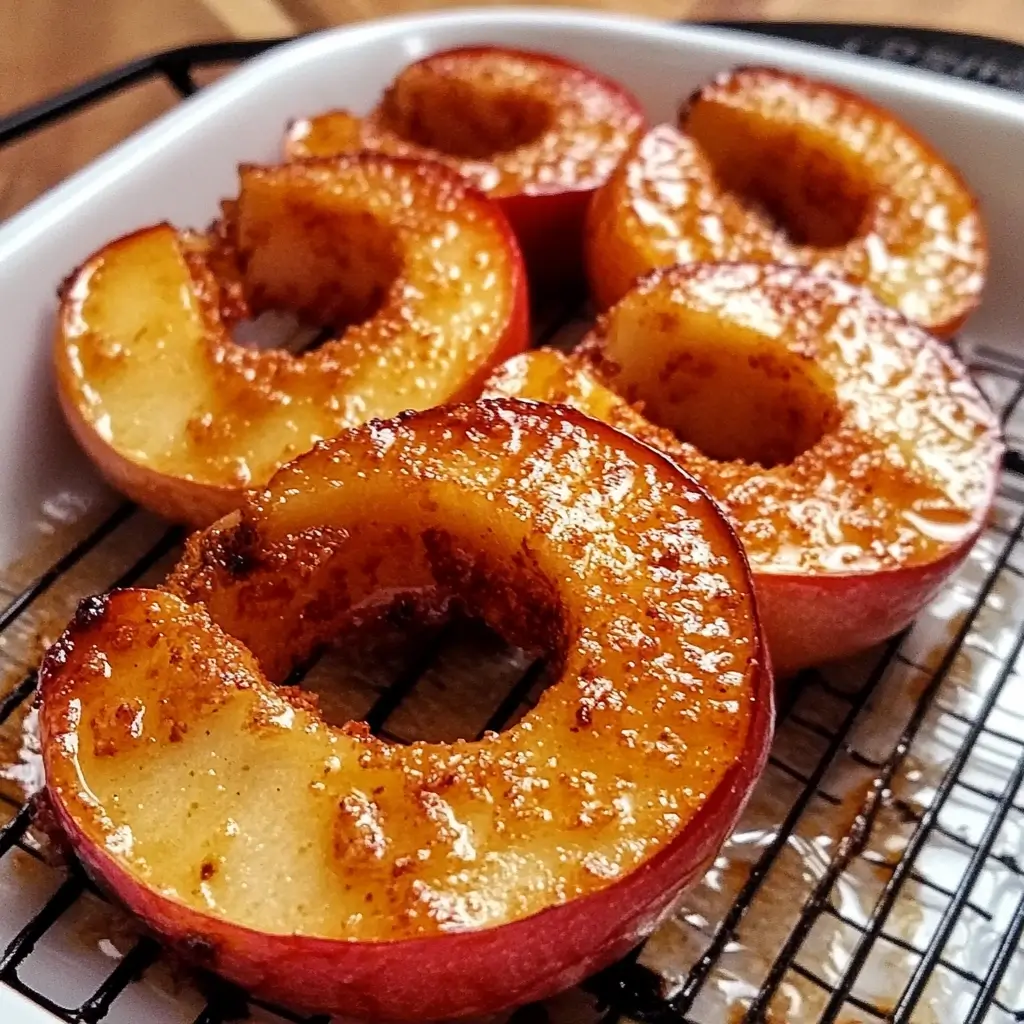

The crisp air of autumn has a unique way of turning my kitchen into a sanctuary of warm, spiced aromas. Last Saturday, with a bushel of freshly picked apples from a local orchard sitting on my counter, I knew I had to make something special. Instead of the usual pie or crumble, I opted for something simpler, something my kids could help with and snack on all week. That’s how this recipe for Baked Apple Rings came to life. The moment they came out of the oven, the house filled with the intoxicating scent of cinnamon and caramelized apple. My youngest, who usually turns his nose up at fruit, couldn’t keep his hands off them, calling them “apple cookies.” They were a runaway hit—chewy, sweet, a little tart, and wonderfully wholesome. They’ve become our new go-to snack, perfect for tucking into lunchboxes, munching on during movie night, or simply enjoying with a cup of tea. This recipe isn’t just about making a healthy treat; it’s about creating a simple, cozy memory with every delicious bite.
Why You’ll Fall in Love with This Baked Apple Rings Recipe
Before we dive into the delicious details, let’s talk about why this recipe is about to become a staple in your home. It’s more than just a snack; it’s a versatile, healthy, and incredibly easy-to-make treat that appeals to everyone.
- Incredibly Healthy: This is a guilt-free indulgence. By baking instead of frying, you get all the flavor without the excess oil and fat. It’s a fantastic way to satisfy a sweet craving with the natural goodness of fruit, fiber, and vitamins.
- Fantastically Kid-Friendly: From the preparation to the eating, kids adore this recipe. They can help wash the apples and toss the rings in the cinnamon-sugar mixture. And because they taste like a natural candy, even the pickiest eaters are won over.
- Effortlessly Simple: With just a handful of common ingredients and a straightforward process, this recipe is perfect for beginner cooks. There’s no complex technique, just simple slicing, tossing, and baking.
- Wonderfully Versatile: As you’ll see in our serving suggestions, these apple rings are not just for snacking. Use them as a topping for oatmeal, a garnish for pork dishes, or a crunchy addition to a cheese board.
- Perfect for Meal Prep: Make a large batch at the beginning of the week, and you have a ready-to-go snack for days. They pack beautifully in lunchboxes and are ideal for on-the-go nibbling.
- Customizable Flavors: While cinnamon is a classic, you can easily adapt the spice blend to your liking. Think nutmeg, cardamom, apple pie spice, or even a pinch of cayenne for a spicy kick.
Ingredients
This recipe relies on a few simple, high-quality ingredients to create its magical flavor. The star, of course, is the apple, so choosing the right one can make all the difference.
- 4 large, firm apples (like Honeycrisp, Granny Smith, or Fuji): These varieties are ideal as they hold their shape and provide a perfect balance of tart and sweet when baked.
- 2 tablespoons granulated sugar (or coconut sugar): This provides a touch of sweetness and helps the rings caramelize beautifully in the oven.
- 1 tablespoon ground cinnamon: The quintessential warm spice that pairs perfectly with apples, creating that classic, comforting aroma and flavor.
- Juice of half a lemon (optional): A small amount of lemon juice tossed with the apple slices prevents them from browning (oxidizing) while you work.
Instructions
Follow these step-by-step instructions to achieve perfectly chewy and delicious baked apple rings every time. The key to success is patience and baking them low and slow to dehydrate them properly.
Step 1: Preparation is Key
Preheat your oven to 225°F (110°C). This low temperature is crucial for dehydrating the apples rather than cooking them, which results in that desirable chewy texture. Line two large baking sheets with parchment paper. Using parchment paper is essential to prevent the apple rings from sticking as their natural sugars release and caramelize.
Step 2: Core and Slice the Apples
Wash and dry your apples thoroughly. There’s no need to peel them; the skin adds a lovely color, texture, and extra fiber. Using an apple corer, remove the core from the center of each apple. If you don’t have a corer, you can slice the apples first and then use a small cookie cutter or a paring knife to remove the core and seeds from each individual slice.
Once cored, place the apple on its side and slice it into thin, uniform rings, about 1/8 to 1/4-inch thick. Uniformity is important for even baking. A mandoline slicer is the best tool for this job, as it guarantees perfectly even slices, but a sharp knife and a steady hand will also work well.
Step 3: Season the Rings
In a large bowl, combine the granulated sugar and ground cinnamon. Mix them together until they are evenly distributed. If you’re using lemon juice to prevent browning, toss the apple slices with the juice first in a separate bowl.
Add the apple rings to the cinnamon-sugar mixture. Use your hands or a soft spatula to gently toss the rings until they are all lightly and evenly coated. Make sure to separate any rings that are stuck together so the seasoning can cover all surfaces.
Step 4: Arrange and Bake
Carefully arrange the coated apple rings on the prepared baking sheets in a single layer. Do not overlap them! Overlapping will cause the apples to steam instead of bake, resulting in a soft, soggy texture. You need proper air circulation around each ring to achieve that chewy, dehydrated consistency. It’s better to use multiple baking sheets than to overcrowd one.
Place the baking sheets in the preheated oven. Bake for 1 hour.
Step 5: Flip and Continue Baking
After 1 hour, remove the baking sheets from the oven. Carefully flip each apple ring over using tongs or a spatula. This step ensures both sides dry out evenly. Return the sheets to the oven and continue to bake for another 1 to 1.5 hours.
The total baking time can vary depending on the thickness of your slices and the moisture content of your apples. The rings are done when they are dry to the touch, slightly shrunken, and have a chewy texture. They will not be completely crisp like a chip right out of the oven; they will continue to crisp up as they cool.
Step 6: Cool and Store
Once baked, remove the apple rings from the oven and transfer them to a wire cooling rack. Let them cool completely to room temperature. This is a vital step, as they will become firmer and chewier (or crispier if you baked them longer) during the cooling process. Store the cooled apple rings in an airtight container at room temperature for up to a week.
Nutrition Facts
These Baked Apple Rings are a powerhouse of simple, clean nutrition, making them a smart choice for a snack.
- Servings: This recipe makes approximately 4 servings.
- Calories per serving: Approximately 95 calories.
- Fiber (4g): Apples are a great source of dietary fiber, which is essential for digestive health and helps you feel full and satisfied.
- Vitamin C (8% of DV): A natural antioxidant found in apples that supports a healthy immune system.
- Natural Sugars (18g): The majority of the sugar comes from the apples themselves, providing a quick source of natural energy without the crash of processed snacks.
- Low in Fat (0.2g): Being baked instead of fried, these rings are virtually fat-free, making them a heart-healthy option.
- Potassium (150mg): An important mineral that helps regulate fluid balance and nerve signals in the body.
Preparation Time
This is an easy recipe, but it requires some patience while baking to achieve the perfect texture.
- Prep Time: 15 minutes
- Cook Time: 2 – 2.5 hours
- Total Time: Approximately 2 hours and 45 minutes
- Description: The hands-on preparation is quick and simple. Most of the time is dedicated to the low-and-slow baking process, which requires minimal supervision. It’s the perfect recipe to make on a lazy weekend afternoon while you’re at home doing other things.
The Science of Baking Apple Rings: Getting That Perfect Texture
Ever wonder what’s happening inside your oven to transform a juicy apple slice into a chewy, concentrated treat? It’s a simple but fascinating scientific process. The goal of this recipe isn’t to cook the apple in the traditional sense, but to dehydrate it.
By setting the oven to a low temperature (225°F / 110°C), you are encouraging water evaporation. The slow, gentle heat allows the water molecules within the apple’s cells to slowly turn to vapor and escape, without rupturing the cell walls too aggressively. This is why the apple shrinks and its flavors become intensely concentrated. If the heat were too high, the water would boil, steaming the apple from the inside out and resulting in a soft, mushy texture like applesauce.
The cinnamon-sugar coating plays a dual role. The sugar not only adds sweetness but also aids in the dehydration process through osmosis, drawing more moisture to the surface of the apple slice. As this sugary liquid heats up, it undergoes a slight caramelization, contributing to the delicious flavor and slightly crisp edges. The final cooling step on a wire rack is also critical. As the warm, pliable rings cool, the remaining sugars solidify, and the texture sets, turning them from soft to perfectly chewy and firm.
Choosing the Perfect Apple: A Deep Dive
The type of apple you choose is arguably the most important decision you’ll make for this recipe. Different apples have varying levels of sweetness, tartness, and water content, and their flesh has different densities. Here’s a breakdown of the best choices:
- Honeycrisp: A top-tier choice. Known for its incredible crispness and a well-balanced sweet-tart flavor. Its firm flesh holds up exceptionally well to the long baking time, ensuring your rings don’t turn to mush.
- Granny Smith: If you prefer a more tart flavor profile, Granny Smith is your go-to. Its sharp tartness mellows slightly during baking but provides a fantastic counterpoint to the sweet cinnamon coating. It is also very firm, making it structurally ideal.
- Fuji: A wonderfully sweet and juicy apple. Because of its higher sugar content, Fuji apples caramelize beautifully. They result in a sweeter, more candy-like apple ring.
- Gala: A milder, sweeter apple that’s also a great option. It has a thinner skin and a less dense flesh, so you may need to reduce the baking time slightly.
- Pink Lady (Cripps Pink): Similar to Honeycrisp, it offers a firm texture and a lovely balance of sweet and tart flavors. It’s an excellent all-around choice for this recipe.
Apples to Avoid: Softer varieties like Red Delicious, McIntosh, or Golden Delicious are not recommended. Their flesh is too mealy and high in water content, causing them to break down and become mushy during the slow baking process. Stick to firm, crisp apples for the best results.
How to Serve
These Baked Apple Rings are incredibly versatile. While they are perfect on their own, here are some creative and delicious ways to serve them.
- As a Standalone Snack:
- Pack them in a small bag or container for a healthy on-the-go snack.
- Serve them in a bowl for after-school snacking.
- Arrange them on a platter for a healthy party food option.
- As a Crunchy Topping:
- Crumble them over a bowl of hot oatmeal or overnight oats.
- Add them to your morning yogurt parfait for texture and flavor.
- Sprinkle them over a scoop of vanilla or caramel ice cream for a decadent dessert.
- Use them as a garnish on smoothie bowls.
- In Savory Dishes:
- Serve alongside roasted pork loin or pork chops. The sweet and spiced flavor of the apple cuts through the richness of the meat.
- Chop them up and add them to a fall-themed salad with walnuts, goat cheese, and a vinaigrette dressing.
- With Dips and Spreads:
- Serve with a side of creamy caramel dip for a classic treat.
- Pair them with a scoop of almond butter or peanut butter for a protein-packed snack.
- Offer them with a sweet cream cheese dip, flavored with a little maple syrup.
- On a Charcuterie or Cheese Board:
- Arrange them alongside sharp cheddar, creamy brie, and tangy goat cheese.
- Their chewy texture and sweet flavor provide a wonderful contrast to cured meats and salty nuts.
Additional Tips for Perfection
Unlock the full potential of your Baked Apple Rings with these eight expert tips.
- Invest in a Mandoline Slicer: For truly professional and consistent results, a mandoline is your best friend. It ensures every slice is the exact same thickness, which is the secret to even baking. Just be sure to use the safety guard!
- Don’t Skip the Lemon Juice: If you’re working slowly or get interrupted, tossing the apple slices in a little lemon juice is a foolproof way to keep them from turning brown and unappetizing before they even hit the oven.
- Experiment with Spices: Cinnamon is classic, but don’t be afraid to customize. Try a pre-made apple pie spice, or create your own blend with nutmeg, cardamom, allspice, and a pinch of ground ginger for a more complex flavor.
- For Extra Crispiness: If you prefer a crispier, chip-like texture over a chewy one, slice the apples as thinly as possible (1/16-inch) and increase the baking time. Check them every 15 minutes after the 2-hour mark until they reach your desired crispness.
- Go Sugar-Free: For an even healthier version, you can omit the sugar entirely. The apples have plenty of natural sweetness that becomes concentrated during baking. The cinnamon alone will still provide a wonderful, warm flavor.
- Batch and Store Properly: This recipe is perfect for making in large batches. To ensure they last, make sure the rings are completely cool before storing them in an airtight container. Any residual warmth will create condensation and make them soggy.
- Use a Convection Setting if You Have It: If your oven has a convection setting, use it! The circulating air will help dehydrate the apples more quickly and evenly. Reduce the oven temperature by 25°F (about 15°C) and start checking for doneness about 30 minutes earlier.
- Don’t Waste the Cores: If you’re feeling resourceful, don’t throw away the apple cores. You can use them to make a simple apple scrap vinegar or boil them with a cinnamon stick and some water to make your entire house smell amazing.
Frequently Asked Questions (FAQ)
Here are answers to some of the most common questions about making Baked Apple Rings.
1. What are the absolute best apples to use for this recipe?
The best apples are firm, crisp, and have a good balance of sweet and tart flavors. Honeycrisp, Granny Smith, Fuji, Gala, and Pink Lady are all excellent choices because their structure holds up during the long, slow bake, preventing them from turning into mush.
2. Can I make these baked apple rings without any sugar?
Absolutely! The apples contain a lot of natural sugar that becomes concentrated as they dehydrate, so they will still be pleasantly sweet. Simply omit the sugar and toss the rings in cinnamon (and other spices, if you like) before baking. They will be a wonderfully healthy, whole-food snack.
3. How do I store baked apple rings to keep them fresh?
The key to proper storage is to ensure they are completely cool before you put them away. Store them in an airtight container, such as a glass jar or a zip-top bag, at room temperature. They should stay fresh for up to a week. Do not refrigerate them, as the moisture in the fridge can make them soft.
4. Why did my apple rings turn out soggy instead of chewy?
Soggy apple rings are usually caused by one of three things: the oven temperature was too high (which steams them), the slices were too thick, or the slices were overcrowded on the baking sheet. To fix this, ensure your oven is at a low 225°F (110°C), slice the apples thinly and uniformly, and always arrange them in a single, non-overlapping layer.
5. Can I make these in an air fryer instead of the oven?
Yes, an air fryer is a great tool for making apple rings and works much faster! Arrange the seasoned rings in a single layer in the air fryer basket. Cook at 300°F (150°C) for about 15-20 minutes, flipping halfway through. Keep a close eye on them as they can go from perfect to burnt very quickly.
6. Are these baked apple rings a healthy snack for kids and toddlers?
Yes, they are an excellent healthy snack. They are made from whole fruit and are naturally sweet. For very young toddlers, you can make them without the added sugar and ensure they are baked to a soft, chewy consistency (not too crisp) to make them easy to eat.
7. How do I know for sure when the apple rings are done baking?
They are done when they have significantly shrunk in size, feel dry to the touch, and are no longer flimsy. They should be pliable and chewy but not wet. They will firm up and get even chewier or crispier as they cool on the wire rack, so it’s okay if they feel a little soft right out of the oven.
8. My apple rings got soft after a few days. Can I re-crisp them?
Yes, you can! If your apple rings have absorbed some moisture from the air and become too soft, you can spread them back out on a baking sheet and pop them into a 225°F (110°C) oven for 15-20 minutes. Let them cool completely again, and they should regain their desirable texture.

Baked Apple Rings
Ingredients
This recipe relies on a few simple, high-quality ingredients to create its magical flavor. The star, of course, is the apple, so choosing the right one can make all the difference.
- 4 large, firm apples (like Honeycrisp, Granny Smith, or Fuji): These varieties are ideal as they hold their shape and provide a perfect balance of tart and sweet when baked.
- 2 tablespoons granulated sugar (or coconut sugar): This provides a touch of sweetness and helps the rings caramelize beautifully in the oven.
- 1 tablespoon ground cinnamon: The quintessential warm spice that pairs perfectly with apples, creating that classic, comforting aroma and flavor.
- Juice of half a lemon (optional): A small amount of lemon juice tossed with the apple slices prevents them from browning (oxidizing) while you work.
Instructions
Follow these step-by-step instructions to achieve perfectly chewy and delicious baked apple rings every time. The key to success is patience and baking them low and slow to dehydrate them properly.
Preheat your oven to 225°F (110°C). This low temperature is crucial for dehydrating the apples rather than cooking them, which results in that desirable chewy texture. Line two large baking sheets with parchment paper. Using parchment paper is essential to prevent the apple rings from sticking as their natural sugars release and caramelize.
Wash and dry your apples thoroughly. There’s no need to peel them; the skin adds a lovely color, texture, and extra fiber. Using an apple corer, remove the core from the center of each apple. If you don’t have a corer, you can slice the apples first and then use a small cookie cutter or a paring knife to remove the core and seeds from each individual slice.
Once cored, place the apple on its side and slice it into thin, uniform rings, about 1/8 to 1/4-inch thick. Uniformity is important for even baking. A mandoline slicer is the best tool for this job, as it guarantees perfectly even slices, but a sharp knife and a steady hand will also work well.
In a large bowl, combine the granulated sugar and ground cinnamon. Mix them together until they are evenly distributed. If you’re using lemon juice to prevent browning, toss the apple slices with the juice first in a separate bowl.
Add the apple rings to the cinnamon-sugar mixture. Use your hands or a soft spatula to gently toss the rings until they are all lightly and evenly coated. Make sure to separate any rings that are stuck together so the seasoning can cover all surfaces.
Carefully arrange the coated apple rings on the prepared baking sheets in a single layer. Do not overlap them! Overlapping will cause the apples to steam instead of bake, resulting in a soft, soggy texture. You need proper air circulation around each ring to achieve that chewy, dehydrated consistency. It’s better to use multiple baking sheets than to overcrowd one.
Place the baking sheets in the preheated oven. Bake for 1 hour.
After 1 hour, remove the baking sheets from the oven. Carefully flip each apple ring over using tongs or a spatula. This step ensures both sides dry out evenly. Return the sheets to the oven and continue to bake for another 1 to 1.5 hours.
The total baking time can vary depending on the thickness of your slices and the moisture content of your apples. The rings are done when they are dry to the touch, slightly shrunken, and have a chewy texture. They will not be completely crisp like a chip right out of the oven; they will continue to crisp up as they cool.
Once baked, remove the apple rings from the oven and transfer them to a wire cooling rack. Let them cool completely to room temperature. This is a vital step, as they will become firmer and chewier (or crispier if you baked them longer) during the cooling process. Store the cooled apple rings in an airtight container at room temperature for up to a week.
Nutrition
- Serving Size: one normal portion
- Calories: 95
- Sugar: 18g
- Fiber: 4g